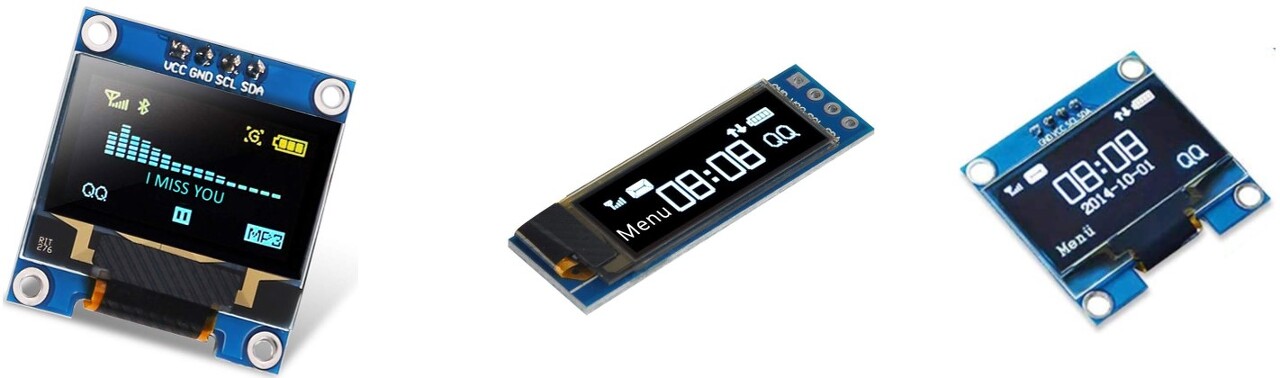
OLED(Organic Light-Emitting Diode) 디스플레이는 LCD 디스플레이의 대안입니다.
OLED는 초경량, 거의 종이처럼 얇고 유연하며 더 밝고 선명한 화면을 제공합니다.
이 튜토리얼에서는 다음을 배울 것입니다.
- Arduino와 함께 OLED 디스플레이를 사용하는 방법.
- OLED에 텍스트, 숫자를 표시하는 방법
- OLED에 그리는 방법
- OLED에 이미지를 표시하는 방법
필요한 하드웨어
| Arduino UNO 또는 Genuino UNO |
| USB 2.0 케이블 유형 A/B |
| SSD1306 I2C OLED 디스플레이 128x64 |
| 점퍼 와이어 |
OLED 디스플레이 정보
OLED 디스플레이에는 여러 유형이 있습니다. 통신 인터페이스, 크기 및 색상이 서로 다릅니다.
- 통신 인터페이스: I2C, SPI
- 크기: 128x64, 128x32...
- 색상: 흰색, 파란색, 이중 색상...
SPI는 일반적으로 I2C보다 빠르지만 더 많은 Arduino 핀이 필요합니다.
I2C는 2개의 핀만 필요하며 다른 I2C 주변기기와 공유할 수 있습니다.
핀과 통신 속도 사이의 절충안입니다. 선택은 당신에게 달려 있습니다.
I2C 인터페이스가 있는 OLED의 경우 SSD1306, SH1106 드라이버와 같은 여러 유형의 드라이버가 있습니다.
이 튜토리얼은 SSD1306 128x64 I2C OLED 디스플레이를 사용합니다.
I2C OLED 디스플레이 핀아웃
- GND 핀: Arduino의 접지에 연결해야 합니다.
- VCC 핀: Arduino의 5볼트 핀을 연결하는 디스플레이용 전원 공급 장치입니다.
- SCL 핀: I2C 인터페이스용 직렬 클록 핀입니다.
- SDA 핀: I2C 인터페이스용 직렬 데이터 핀입니다.

배선도
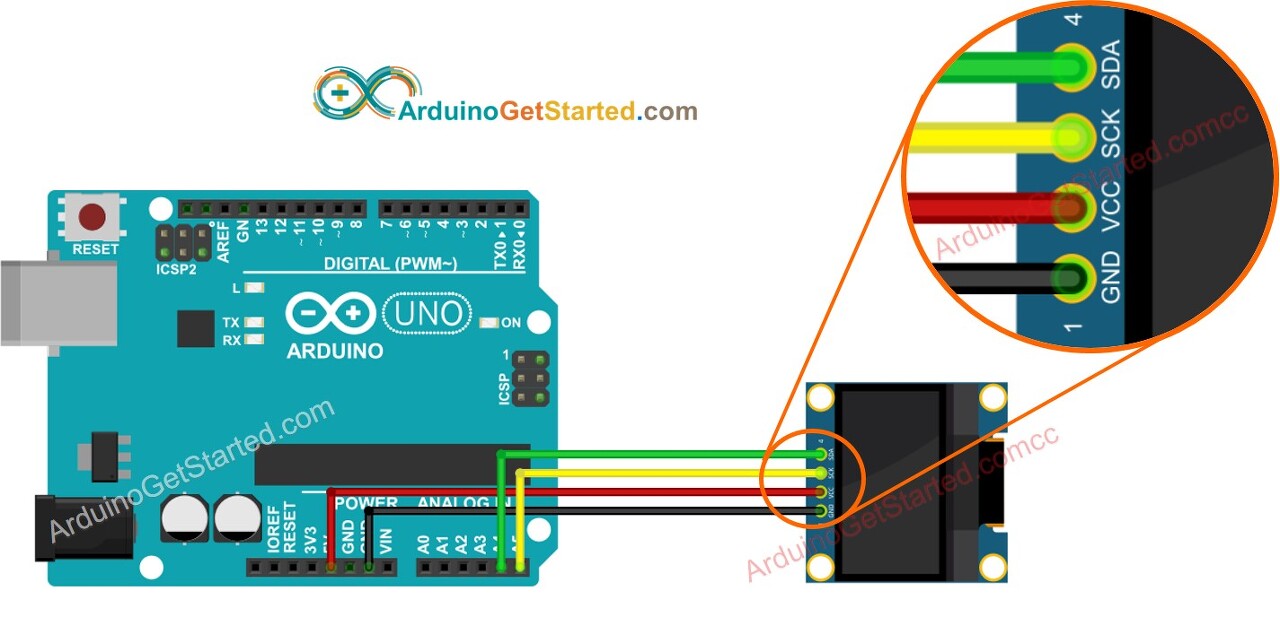
※ 참고:
- OLED 모듈의 핀 순서는 제조사마다 다를 수 있습니다.
항상 OLED 모듈에 인쇄된 라벨을 사용하십시오. 잘 봐봐! - 위의 배선도에서 암수 점퍼선만 사용하면 됩니다.
수-수 점퍼선을 사용하는 경우 브레드보드 를 추가 로 사용해야 합니다.
점퍼 와이어 에 대해 자세히 알아보기
Uno가 아닌 다른 Arduino를 사용하는 경우 핀이 다릅니다.
다른 Arduino는 아래 표를 참조하십시오.
| 구 분 | SCL | SDA |
| 아두이노 우노 | A5 | A4 |
| 아두이노 나노 | A5 | A4 |
| 아두이노 메가 | 21 | 20 |
| 레오나르도/마이크로 | 3 | 2 |
Arduino와 함께 OLED를 사용하는 방법
SSD1306 OLED 라이브러리 설치
- Arduino IDE에서 도구로 이동 라이브러리 관리
- "SSD1306"을 검색 한 다음 Adafruit의 SSD1306 라이브러리를 찾습니다.
- 설치 버튼을 클릭 하여 라이브러리를 설치합니다.
- 다른 라이브러리 종속성을 설치해야 합니다.
- 모든 라이브러리 종속성을 설치하려면 모두 설치 버튼을 클릭 합니다 .
OLED용 프로그램
- 라이브러리 포함
#include <Wire.h> #include <Adafruit_GFX.h> #include <Adafruit_SSD1306.h> - SSD1306 OLED 개체 선언
#define SCREEN_WIDTH 128 // OLED display width, in pixels #define SCREEN_HEIGHT 64 // OLED display height, in pixels // declare an SSD1306 display object connected to I2C Adafruit_SSD1306 oled(SCREEN_WIDTH, SCREEN_HEIGHT, &Wire, -1); - setup() 함수에서, 표시 OLED display 초기화
// initialize OLED display with address 0x3C for 128x64 if (!oled.begin(SSD1306_SWITCHCAPVCC, 0x3C)) { Serial.println(F("SSD1306 allocation failed")); while (true); } - 그런 다음 텍스트, 이미지, 선 그리기 등을 표시할 수 있습니다.
Arduino 코드 - OLED에 텍스트 표시
/*
 * Created by ArduinoGetStarted.com
 *
 * This example code is in the public domain
 *
 * Tutorial page: https://arduinogetstarted.com/tutorials/arduino-oled
 */

#include <Wire.h>
#include <Adafruit_GFX.h>
#include <Adafruit_SSD1306.h>

#define SCREEN_WIDTH 128 // OLED display width,  in pixels
#define SCREEN_HEIGHT 64 // OLED display height, in pixels

// declare an SSD1306 display object connected to I2C
Adafruit_SSD1306 oled(SCREEN_WIDTH, SCREEN_HEIGHT, &Wire, -1);

void setup() {
  Serial.begin(9600);

  // initialize OLED display with address 0x3C for 128x64
  if (!oled.begin(SSD1306_SWITCHCAPVCC, 0x3C)) {
    Serial.println(F("SSD1306 allocation failed"));
    while (true);
  }

  delay(2000);         // wait for initializing
  oled.clearDisplay(); // clear display

  oled.setTextSize(1);          // text size
  oled.setTextColor(WHITE);     // text color
  oled.setCursor(0, 10);        // position to display
  oled.println("Hello World!"); // text to display
  oled.display();               // show on OLED
}

void loop() {
}
다음은 OLED에 텍스트를 표시하는 데 사용할 수 있는 몇 가지 기능입니다.
- oled.clearDisplay() : 모든 픽셀이 꺼져 있습니다.
- oled.drawPixel(x,y, color) : x,y 좌표에 픽셀을 그립니다.
- oled.setTextSize(n) : 글꼴 크기를 설정하고 1에서 8까지의 크기를 지원합니다.
- oled.setCursor (x,y) : 텍스트 쓰기를 시작할 좌표 설정
- oled.setTextColor(WHITE) : 텍스트 색상 설정
- oled.setTextColor(BLACK, WHITE) : 텍스트 색상, 배경 색상 설정
- oled.println ("메시지") : 문자를 인쇄합니다.
- oled.println (숫자) : 숫자를 출력
- oled.println (숫자, HEX ) : 16진수 형식으로 숫자를 인쇄합니다.
- oled.display () : 변경 사항을 적용하려면 이 메서드를 호출합니다.
- oled.startscrollright(start, stop ) : 텍스트를 왼쪽에서 오른쪽으로 스크롤
- oled.startscrollleft(start, stop ) : 텍스트를 오른쪽에서 왼쪽으로 스크롤
- oled.startscrolldiagright(start, stop ) : 왼쪽 하단 모서리에서 오른쪽 상단 모서리로 텍스트 스크롤
- oled.startscrolldiagleft(start, stop ) : 오른쪽 하단 모서리에서 왼쪽 상단 모서리로 텍스트 스크롤
- oled.stopscroll() : 스크롤 중지
Arduino 코드 - OLED에 그리기
/*
 * Created by ArduinoGetStarted.com
 *
 * This example code is in the public domain
 *
 * Tutorial page: https://arduinogetstarted.com/tutorials/arduino-oled
 */

#include <Wire.h>
#include <Adafruit_GFX.h>
#include <Adafruit_SSD1306.h>

#define SCREEN_WIDTH 128 // OLED display width,  in pixels
#define SCREEN_HEIGHT 64 // OLED display height, in pixels

// declare an SSD1306 display object connected to I2C
Adafruit_SSD1306 oled(SCREEN_WIDTH, SCREEN_HEIGHT, &Wire, -1);

void setup() {
  Serial.begin(9600);

  // initialize OLED display with address 0x3C for 128x64
  if (!oled.begin(SSD1306_SWITCHCAPVCC, 0x3C)) {
    Serial.println(F("SSD1306 allocation failed"));
    while (true);
  }

  delay(2000); // wait for initializing
  oled.setCursor(0, 0);
}

void loop() {
  // draw rectangle
  oled.clearDisplay();
  oled.drawRect(0, 15, 60, 40, WHITE);
  oled.display();
  delay(2000);

  // fill rectangle
  oled.clearDisplay();
  oled.fillRect(0, 15, 60, 40, WHITE);
  oled.display();
  delay(2000);


  // draw the round rectangle
  oled.clearDisplay();
  oled.drawRoundRect(0, 15, 60, 40, 8, WHITE);
  oled.display();
  delay(2000);

  // fill the round rectangle
  oled.clearDisplay();
  oled.fillRoundRect(0, 15, 60, 40, 8, WHITE);
  oled.display();
  delay(2000);

  // draw circle
  oled.clearDisplay();
  oled.drawCircle(20, 35, 20, WHITE);
  oled.display();
  delay(2000);

  // fill circle
  oled.clearDisplay();
  oled.fillCircle(20, 35, 20, WHITE);
  oled.display();
  delay(2000);

  // draw triangle
  oled.clearDisplay();
  oled.drawTriangle(30, 15, 0, 60, 60, 60, WHITE);
  oled.display();
  delay(2000);

  // fill triangle
  oled.clearDisplay();
  oled.fillTriangle(30, 15, 0, 60, 60, 60, WHITE);
  oled.display();
  delay(2000);
}
Arduino 코드 – 이미지 표시
OLED에 이미지를 그리려면 먼저 이미지(모든 형식)를 비트맵 배열로 변환해야 합니다.
변환은 이 온라인 도구 를 사용하여 수행할 수 있습니다 .
아래 이미지에서 이미지를 비트맵 배열로 변환하는 방법을 참조하십시오.
Arduino 아이콘을 비트맵 배열로 변환했습니다.
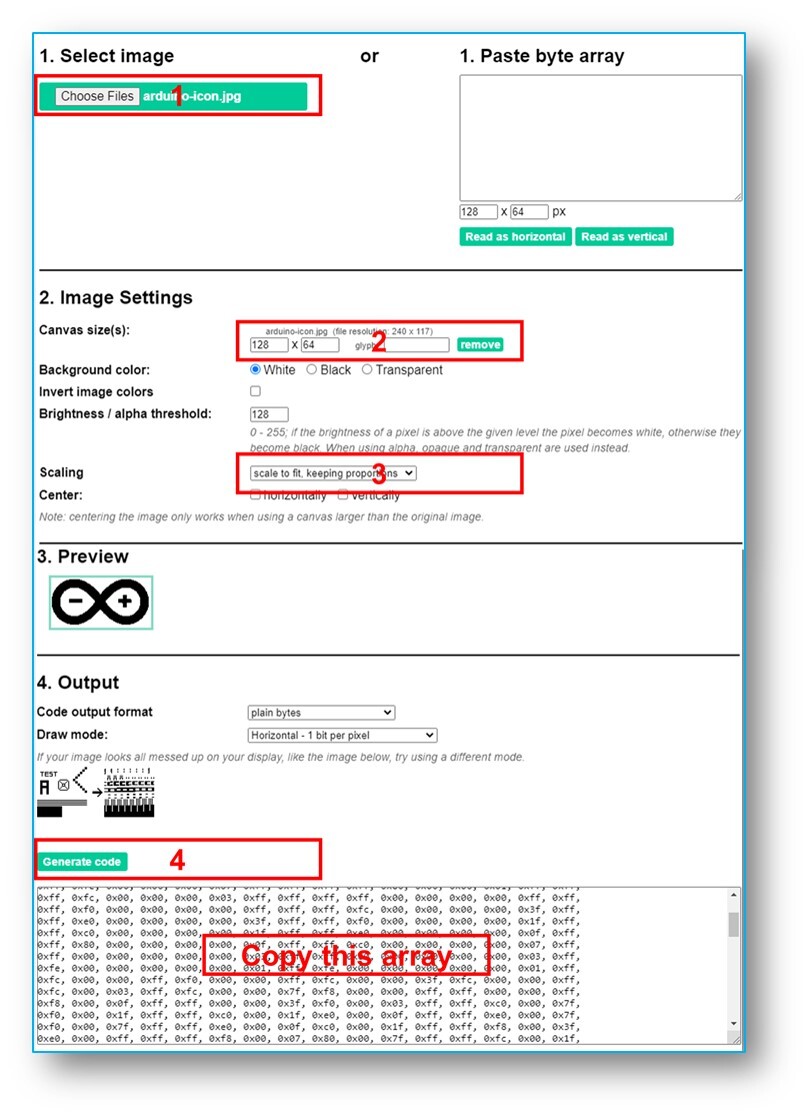
변환 후 배열 코드를 복사하여 아래 코드의 ArduinoIcon 배열에 있는 배열 코드를 업데이트합니다.
/*
 * Created by ArduinoGetStarted.com
 *
 * This example code is in the public domain
 *
 * Tutorial page: https://arduinogetstarted.com/tutorials/arduino-oled
 */

#include <Wire.h>
#include <Adafruit_GFX.h>
#include <Adafruit_SSD1306.h>

#define SCREEN_WIDTH 128 // OLED display width,  in pixels
#define SCREEN_HEIGHT 64 // OLED display height, in pixels

// declare an SSD1306 display object connected to I2C
Adafruit_SSD1306 oled(SCREEN_WIDTH, SCREEN_HEIGHT, &Wire, -1);

// bitmap of arduino-icon image
const unsigned char ArduinoIcon [] PROGMEM = {
  // 'arduino-icon', 128x64px
  0xff, 0xff, 0xff, 0xff, 0xff, 0xff, 0xff, 0xff, 0xff, 0xff, 0xff, 0xff, 0xff, 0xff, 0xff, 0xff,
  0xff, 0xff, 0xff, 0xff, 0xff, 0xff, 0xff, 0xff, 0xff, 0xff, 0xff, 0xff, 0xff, 0xff, 0xff, 0xff,
  0xff, 0xff, 0xfe, 0x00, 0x07, 0xff, 0xff, 0xff, 0xff, 0xff, 0xff, 0x80, 0x01, 0xff, 0xff, 0xff,
  0xff, 0xff, 0xe0, 0x00, 0x00, 0xff, 0xff, 0xff, 0xff, 0xff, 0xfc, 0x00, 0x00, 0x3f, 0xff, 0xff,
  0xff, 0xff, 0x80, 0x00, 0x00, 0x1f, 0xff, 0xff, 0xff, 0xff, 0xe0, 0x00, 0x00, 0x07, 0xff, 0xff,
  0xff, 0xfe, 0x00, 0x00, 0x00, 0x07, 0xff, 0xff, 0xff, 0xff, 0x80, 0x00, 0x00, 0x01, 0xff, 0xff,
  0xff, 0xfc, 0x00, 0x00, 0x00, 0x03, 0xff, 0xff, 0xff, 0xff, 0x00, 0x00, 0x00, 0x00, 0xff, 0xff,
  0xff, 0xf0, 0x00, 0x00, 0x00, 0x00, 0xff, 0xff, 0xff, 0xfc, 0x00, 0x00, 0x00, 0x00, 0x3f, 0xff,
  0xff, 0xe0, 0x00, 0x00, 0x00, 0x00, 0x3f, 0xff, 0xff, 0xf0, 0x00, 0x00, 0x00, 0x00, 0x1f, 0xff,
  0xff, 0xc0, 0x00, 0x00, 0x00, 0x00, 0x1f, 0xff, 0xff, 0xe0, 0x00, 0x00, 0x00, 0x00, 0x0f, 0xff,
  0xff, 0x80, 0x00, 0x00, 0x00, 0x00, 0x0f, 0xff, 0xff, 0xc0, 0x00, 0x00, 0x00, 0x00, 0x07, 0xff,
  0xff, 0x00, 0x00, 0x00, 0x00, 0x00, 0x03, 0xff, 0xff, 0x80, 0x00, 0x00, 0x00, 0x00, 0x03, 0xff,
  0xfe, 0x00, 0x00, 0x00, 0x00, 0x00, 0x01, 0xff, 0xfe, 0x00, 0x00, 0x00, 0x00, 0x00, 0x01, 0xff,
  0xfc, 0x00, 0x00, 0xff, 0xf0, 0x00, 0x00, 0xff, 0xfc, 0x00, 0x00, 0x3f, 0xfc, 0x00, 0x00, 0xff,
  0xfc, 0x00, 0x03, 0xff, 0xfc, 0x00, 0x00, 0x7f, 0xf8, 0x00, 0x00, 0xff, 0xff, 0x00, 0x00, 0xff,
  0xf8, 0x00, 0x0f, 0xff, 0xff, 0x00, 0x00, 0x3f, 0xf0, 0x00, 0x03, 0xff, 0xff, 0xc0, 0x00, 0x7f,
  0xf0, 0x00, 0x1f, 0xff, 0xff, 0xc0, 0x00, 0x1f, 0xe0, 0x00, 0x0f, 0xff, 0xff, 0xe0, 0x00, 0x7f,
  0xf0, 0x00, 0x7f, 0xff, 0xff, 0xe0, 0x00, 0x0f, 0xc0, 0x00, 0x1f, 0xff, 0xff, 0xf8, 0x00, 0x3f,
  0xe0, 0x00, 0xff, 0xff, 0xff, 0xf8, 0x00, 0x07, 0x80, 0x00, 0x7f, 0xff, 0xff, 0xfc, 0x00, 0x1f,
  0xe0, 0x00, 0xff, 0xff, 0xff, 0xfc, 0x00, 0x03, 0x80, 0x00, 0xff, 0xff, 0xff, 0xfc, 0x00, 0x1f,
  0xc0, 0x01, 0xff, 0xff, 0xff, 0xfe, 0x00, 0x03, 0x00, 0x01, 0xff, 0xff, 0xff, 0xfe, 0x00, 0x1f,
  0xc0, 0x03, 0xff, 0xff, 0xff, 0xff, 0x00, 0x00, 0x00, 0x03, 0xff, 0xff, 0xff, 0xff, 0x00, 0x0f,
  0xc0, 0x03, 0xff, 0xff, 0xff, 0xff, 0x80, 0x00, 0x00, 0x07, 0xff, 0xf0, 0x7f, 0xff, 0x00, 0x0f,
  0xc0, 0x07, 0xff, 0xff, 0xff, 0xff, 0xc0, 0x00, 0x00, 0x0f, 0xff, 0xf0, 0x7f, 0xff, 0x80, 0x0f,
  0x80, 0x07, 0xff, 0xff, 0xff, 0xff, 0xe0, 0x00, 0x00, 0x1f, 0xff, 0xf0, 0x7f, 0xff, 0x80, 0x07,
  0x80, 0x0f, 0xff, 0xff, 0xff, 0xff, 0xf0, 0x00, 0x00, 0x3f, 0xff, 0xf0, 0x7f, 0xff, 0xc0, 0x07,
  0x80, 0x0f, 0xff, 0xff, 0xff, 0xff, 0xf8, 0x00, 0x00, 0x7f, 0xff, 0xf0, 0x7f, 0xff, 0xc0, 0x07,
  0x80, 0x0f, 0xfe, 0x00, 0x00, 0xff, 0xfc, 0x00, 0x00, 0xff, 0xfc, 0x00, 0x03, 0xff, 0xc0, 0x07,
  0x80, 0x0f, 0xfe, 0x00, 0x00, 0xff, 0xfe, 0x00, 0x01, 0xff, 0xfc, 0x00, 0x01, 0xff, 0xc0, 0x07,
  0x80, 0x0f, 0xfe, 0x00, 0x00, 0xff, 0xff, 0x00, 0x03, 0xff, 0xfc, 0x00, 0x01, 0xff, 0xc0, 0x07,
  0x80, 0x0f, 0xfe, 0x00, 0x00, 0xff, 0xff, 0x00, 0x03, 0xff, 0xfc, 0x00, 0x01, 0xff, 0xc0, 0x07,
  0x80, 0x0f, 0xfe, 0x00, 0x00, 0xff, 0xff, 0x00, 0x03, 0xff, 0xfc, 0x00, 0x01, 0xff, 0xc0, 0x07,
  0x80, 0x0f, 0xff, 0xff, 0xff, 0xff, 0xfe, 0x00, 0x01, 0xff, 0xff, 0xe0, 0x7f, 0xff, 0xc0, 0x07,
  0x80, 0x0f, 0xff, 0xff, 0xff, 0xff, 0xfc, 0x00, 0x00, 0xff, 0xff, 0xf0, 0x7f, 0xff, 0xc0, 0x07,
  0x80, 0x0f, 0xff, 0xff, 0xff, 0xff, 0xfc, 0x00, 0x00, 0xff, 0xff, 0xf0, 0x7f, 0xff, 0xc0, 0x07,
  0x80, 0x0f, 0xff, 0xff, 0xff, 0xff, 0xf8, 0x00, 0x00, 0x7f, 0xff, 0xf0, 0x7f, 0xff, 0xc0, 0x07,
  0x80, 0x0f, 0xff, 0xff, 0xff, 0xff, 0xf0, 0x00, 0x00, 0x3f, 0xff, 0xf0, 0x7f, 0xff, 0x80, 0x07,
  0x80, 0x07, 0xff, 0xff, 0xff, 0xff, 0xe0, 0x00, 0x00, 0x1f, 0xff, 0xf0, 0x7f, 0xff, 0x80, 0x07,
  0xc0, 0x07, 0xff, 0xff, 0xff, 0xff, 0xc0, 0x00, 0x00, 0x0f, 0xff, 0xff, 0xff, 0xff, 0x80, 0x0f,
  0xc0, 0x03, 0xff, 0xff, 0xff, 0xff, 0x80, 0x00, 0x00, 0x07, 0xff, 0xff, 0xff, 0xff, 0x00, 0x0f,
  0xc0, 0x03, 0xff, 0xff, 0xff, 0xff, 0x00, 0x00, 0x00, 0x03, 0xff, 0xff, 0xff, 0xff, 0x00, 0x0f,
  0xe0, 0x01, 0xff, 0xff, 0xff, 0xfe, 0x00, 0x03, 0x00, 0x01, 0xff, 0xff, 0xff, 0xfe, 0x00, 0x1f,
  0xe0, 0x00, 0xff, 0xff, 0xff, 0xfc, 0x00, 0x07, 0x80, 0x00, 0xff, 0xff, 0xff, 0xfc, 0x00, 0x1f,
  0xe0, 0x00, 0x7f, 0xff, 0xff, 0xf0, 0x00, 0x0f, 0xc0, 0x00, 0x3f, 0xff, 0xff, 0xf8, 0x00, 0x3f,
  0xf0, 0x00, 0x3f, 0xff, 0xff, 0xe0, 0x00, 0x1f, 0xe0, 0x00, 0x1f, 0xff, 0xff, 0xf0, 0x00, 0x3f,
  0xf8, 0x00, 0x1f, 0xff, 0xff, 0x80, 0x00, 0x3f, 0xe0, 0x00, 0x07, 0xff, 0xff, 0xe0, 0x00, 0x7f,
  0xf8, 0x00, 0x0f, 0xff, 0xff, 0x00, 0x00, 0x7f, 0xf8, 0x00, 0x03, 0xff, 0xff, 0xc0, 0x00, 0x7f,
  0xfc, 0x00, 0x03, 0xff, 0xf8, 0x00, 0x00, 0xff, 0xfc, 0x00, 0x00, 0xff, 0xff, 0x00, 0x00, 0xff,
  0xfe, 0x00, 0x00, 0x7f, 0xe0, 0x00, 0x01, 0xff, 0xfe, 0x00, 0x00, 0x1f, 0xf8, 0x00, 0x01, 0xff,
  0xfe, 0x00, 0x00, 0x00, 0x00, 0x00, 0x03, 0xff, 0xff, 0x00, 0x00, 0x00, 0x00, 0x00, 0x03, 0xff,
  0xff, 0x00, 0x00, 0x00, 0x00, 0x00, 0x07, 0xff, 0xff, 0x80, 0x00, 0x00, 0x00, 0x00, 0x03, 0xff,
  0xff, 0x80, 0x00, 0x00, 0x00, 0x00, 0x0f, 0xff, 0xff, 0xc0, 0x00, 0x00, 0x00, 0x00, 0x07, 0xff,
  0xff, 0xc0, 0x00, 0x00, 0x00, 0x00, 0x1f, 0xff, 0xff, 0xe0, 0x00, 0x00, 0x00, 0x00, 0x0f, 0xff,
  0xff, 0xe0, 0x00, 0x00, 0x00, 0x00, 0x7f, 0xff, 0xff, 0xf8, 0x00, 0x00, 0x00, 0x00, 0x3f, 0xff,
  0xff, 0xf8, 0x00, 0x00, 0x00, 0x01, 0xff, 0xff, 0xff, 0xfe, 0x00, 0x00, 0x00, 0x00, 0x7f, 0xff,
  0xff, 0xfc, 0x00, 0x00, 0x00, 0x03, 0xff, 0xff, 0xff, 0xff, 0x00, 0x00, 0x00, 0x00, 0xff, 0xff,
  0xff, 0xff, 0x00, 0x00, 0x00, 0x0f, 0xff, 0xff, 0xff, 0xff, 0xc0, 0x00, 0x00, 0x03, 0xff, 0xff,
  0xff, 0xff, 0xc0, 0x00, 0x00, 0x3f, 0xff, 0xff, 0xff, 0xff, 0xf0, 0x00, 0x00, 0x0f, 0xff, 0xff,
  0xff, 0xff, 0xf0, 0x00, 0x01, 0xff, 0xff, 0xff, 0xff, 0xff, 0xfe, 0x00, 0x00, 0x3f, 0xff, 0xff,
  0xff, 0xff, 0xff, 0x00, 0x0f, 0xff, 0xff, 0xff, 0xff, 0xff, 0xff, 0xc0, 0x03, 0xff, 0xff, 0xff,
  0xff, 0xff, 0xff, 0xff, 0xff, 0xff, 0xff, 0xff, 0xff, 0xff, 0xff, 0xff, 0xff, 0xff, 0xff, 0xff,
  0xff, 0xff, 0xff, 0xff, 0xff, 0xff, 0xff, 0xff, 0xff, 0xff, 0xff, 0xff, 0xff, 0xff, 0xff, 0xff,
  0xff, 0xff, 0xff, 0xff, 0xff, 0xff, 0xff, 0xff, 0xff, 0xff, 0xff, 0xff, 0xff, 0xff, 0xff, 0xff,
  0xff, 0xff, 0xff, 0xff, 0xff, 0xff, 0xff, 0xff, 0xff, 0xff, 0xff, 0xff, 0xff, 0xff, 0xff, 0xff
};

void setup() {
  Serial.begin(9600);

  // initialize OLED display with address 0x3C for 128x64
  if (!oled.begin(SSD1306_SWITCHCAPVCC, 0x3C)) {
    Serial.println(F("SSD1306 allocation failed"));
    while (true);
  }

  delay(2000); // wait for initializing
  oled.setCursor(0, 0);
}

void loop() {
  oled.clearDisplay();

  // display bitmap
  oled.drawBitmap(0, 0, ArduinoIcon, 128, 64, WHITE);
  oled.display();
  delay(2000);

  // invert display
  oled.invertDisplay(1);
  delay(2000);
}
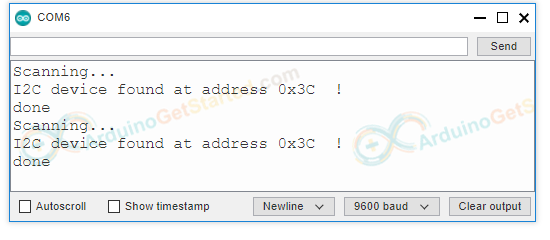
OLED 문제 해결
OLED에 아무 것도 표시되지 않으면 다음 체크리스트를 수행하십시오.
- 배선이 올바른지 확인하십시오.
- I2C OLED가 SSD1306 드라이버를 사용하는지 확인하십시오.
- Arduino에서 아래 I2C Address Scanner 코드를 실행하여 OLED의 I2C 주소를 확인하십시오.
// I2C address scanner program
#include <Wire.h>

void setup()
{
  Wire.begin();
  Serial.begin(9600);
  Serial.println("I2C Scanner");
}

void loop()
{
  byte error, address;
  int nDevices;

  Serial.println("Scanning...");

  nDevices = 0;
  for(address = 1; address < 127; address++ )
  {
    Wire.beginTransmission(address);
    error = Wire.endTransmission();

    if (error == 0)
    {
      Serial.print("I2C device found at address 0x");
      if (address < 16)
        Serial.print("0");

      Serial.print(address,HEX);
      Serial.println("  !");

      nDevices++;
    }
    else if (error==4)
    {
      Serial.print("Unknown error at address 0x");
      if (address < 16)
        Serial.print("0");

      Serial.println(address,HEX);
    }
  }

  if (nDevices == 0)
    Serial.println("No I2C devices found");
  else
    Serial.println("done");

  delay(5000); // wait 5 seconds for next scan
}
직렬 모니터의 결과:
[참조인용번역] https://arduinogetstarted.com/tutorials/arduino-oled
Arduino - OLED | Arduino Tutorial
Learn how to use OLED display with Arduino, how to display text, number on OLED, how to draw on OLED, how to display image on OLED, how to connect OLED to Arduino, how to code for OLED, how to program Arduino step by step. The detail instruction, code, wir
arduinogetstarted.com