우리는 다음 방법을 배울 것입니다:
- DHT11 센서에서 온도와 습도를 읽고 LCD I2C에 표시
- DHT22 센서에서 온도와 습도를 읽고 LCD I2C에 표시
필요한 하드웨어
| Arduino UNO 또는 Genuino UNO |
| USB 2.0 케이블 유형 A/B |
| LCD I2C |
| 온도 및 습도 센서 DHT11 |
| 온도 및 습도 센서 DHT22 |
| 점퍼 와이어 |
DHT11, DHT22 및 LCD 정보
DHT11, DHT22 온도 센서 및 LCD(핀아웃, 작동 방식, 프로그래밍 방법 ...)에 대해 모르는 경우
다음 자습서에서 이에 대해 알아보십시오.
배선도
Arduino - DHT11 모듈 배선

이미지는 Fritzing을 사용하여 개발됩니다 . 이미지를 확대하려면 클릭하세요
Arduino - DHT22 모듈 배선

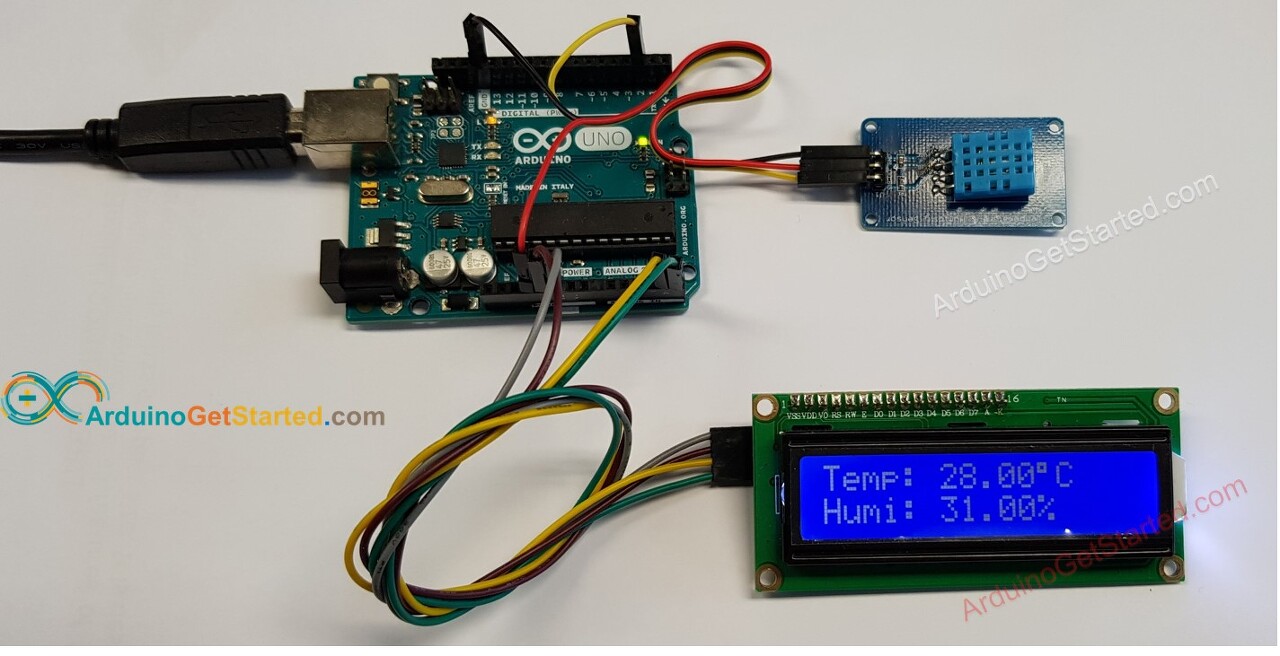
DHT11용 실제 배선
Arduino 코드 - DHT11 센서 - LCD I2C
/*
 * Created by ArduinoGetStarted.com
 *
 * This example code is in the public domain
 *
 * Tutorial page: https://arduinogetstarted.com/tutorials/arduino-temperature-humidity-sensor-lcd
 */

#include <LiquidCrystal_I2C.h>
#include "DHT.h"
#define DHTPIN 2
#define DHTTYPE DHT11

LiquidCrystal_I2C lcd(0x3F, 16, 2);  // I2C address 0x3F, 16 column and 2 rows
DHT dht(DHTPIN, DHTTYPE);

void setup()
{
  dht.begin();     // initialize the sensor
  lcd.init();      // initialize the lcd
  lcd.backlight(); // open the backlight
}

void loop()
{
  delay(2000); // wait a few seconds between measurements

  float humi  = dht.readHumidity();    // read humidity
  float tempC = dht.readTemperature(); // read temperature

  lcd.clear();
  // check if any reads failed
  if (isnan(humi) || isnan(tempC)) {
    lcd.setCursor(0, 0);
    lcd.print("Failed");
  } else {
    lcd.setCursor(0, 0);  // start to print at the first row
    lcd.print("Temp: ");
    lcd.print(tempC);     // print the temperature
    lcd.print((char)223); // print ° character
    lcd.print("C");

    lcd.setCursor(0, 1);  // start to print at the second row
    lcd.print("Humi: ");
    lcd.print(humi);      // print the humidity
    lcd.print("%");
  }
}
빠른 단계
- USB 케이블을 통해 Arduino를 PC에 연결
- Arduino IDE를 열고 올바른 보드와 포트를 선택하십시오.
- Arduino IDE에서 도구로 이동 라이브러리 관리
- "DHT"를 검색 한 다음 Adafruit의 DHT 센서 라이브러리를 찾습니다.
- 설치 버튼을 클릭 하여 라이브러리를 설치합니다.
- 다른 라이브러리 종속성을 설치해야 합니다.
- 모두 설치 버튼 모든 라이브러리 종속성을 클릭 합니다 .
- "LiquidCrystal I2C"를 검색 한 다음 Frank de Brabander의 LiquidCrystal_I2C 라이브러리를 찾습니다.
- 설치 버튼을 클릭 하여 LiquidCrystal_I2C 라이브러리를 설치합니다.
- 위의 코드를 복사하여 Arduino IDE로 엽니다.
- 클릭 업로드 아두 이노 코드를 업로드 아두 이노 IDE 버튼을
- 센서 주변 환경을 더 뜨겁게 또는 더 차갑게 만들기
- LCD에서 결과 보기
위의 코드는 Arduino Nano 에서도 작동합니다 .
Arduino 코드 - DHT22 센서 - LCD I2C
/*
 * Created by ArduinoGetStarted.com
 *
 * This example code is in the public domain
 *
 * Tutorial page: https://arduinogetstarted.com/tutorials/arduino-temperature-humidity-sensor-lcd
 */

#include <LiquidCrystal_I2C.h>
#include "DHT.h"
#define DHTPIN 2
#define DHTTYPE DHT22

LiquidCrystal_I2C lcd(0x3F, 16, 2);  // I2C address 0x3F, 16 column and 2 rows
DHT dht(DHTPIN, DHTTYPE);

void setup()
{
  dht.begin();     // initialize the sensor
  lcd.init();      // initialize the lcd
  lcd.backlight(); // open the backlight
}

void loop()
{
  delay(2000); // wait a few seconds between measurements

  float humi  = dht.readHumidity();    // read humidity
  float tempC = dht.readTemperature(); // read temperature

  lcd.clear();
  // check if any reads failed
  if (isnan(humi) || isnan(tempC)) {
    lcd.setCursor(0, 0);
    lcd.print("Failed");
  } else {
    lcd.setCursor(0, 0);  // start to print at the first row
    lcd.print("Temp: ");
    lcd.print(tempC);     // print the temperature
    lcd.print((char)223); // print ° character
    lcd.print("C");

    lcd.setCursor(0, 1);  // start to print at the second row
    lcd.print("Humi: ");
    lcd.print(humi);      // print the humidity
    lcd.print("%");
  }
}
※ 참고:
DHT11 및 DHT22의 코드는 한 줄의 코드를 제외하고는 동일합니다.
DHT11 및 DHT22용 라이브러리는 동일합니다.
[참조번역인용] https://arduinogetstarted.com/tutorials/arduino-temperature-humidity-sensor-lcd
Arduino - Temperature Humidity Sensor - LCD | Arduino Tutorial
Learn: how to use Arduino to read temperature and humidity from sensor and display temperature and humidity on LCD, how to combine DHT11, DHT22 code and LCD code, how to program Arduino step by step. The detail instruction, code, wiring diagram, video tuto
arduinogetstarted.com