이 튜토리얼에서는 팬과 DHT11 또는 DHT22 센서를 사용하여 온도 제어 온도를 제어합니다.
온도가 너무 높으면 냉각 팬을 켜십시오. 온도가 차가워지면 냉각 팬을 끕니다.
DHT 센더 대신 DS18B20 센서를 사용하려면 Arduino - DS18B20 센서를 사용한 냉각 시스템을 참조하십시오 .
필요한 하드웨어
| Arduino UNO 또는 Genuino UNO |
| USB 2.0 케이블 유형 A/B |
| 온도 및 습도 센서 DHT11 |
| 계전기 |
| 12V 냉각 팬 |
| 12V 전원 어댑터 |
| 점퍼 와이어 |
또는 12V 냉각 팬 대신 5V 냉각 팬 을, DHT11 센서 대신 DHT22 센서를 사용할 수 있습니다.
5V 냉각 팬을 사용하더라도 릴레이와 5V 전원 어댑터가 필요합니다.
Arduino에서 5V를 사용하여 팬에 전원을 공급할 수 없습니다.
냉각 팬 및 DHT 센서 정보
이 튜토리얼에서 사용하는 냉각 팬은 12v 전원 공급 장치를 사용합니다.
팬에 전원이 공급되면 팬이 켜지고 그 반대의 경우도 마찬가지입니다.
Arduino로 팬을 제어하려면 그 사이에 릴레이를 사용해야 합니다.
온도 센서 및 팬(핀아웃, 작동 방식, 프로그래밍 방법 ...)에 대해 모르는 경우
다음 자습서에서 이에 대해 알아보세요.
배선도
- DHT11 모듈이 있는 배선도
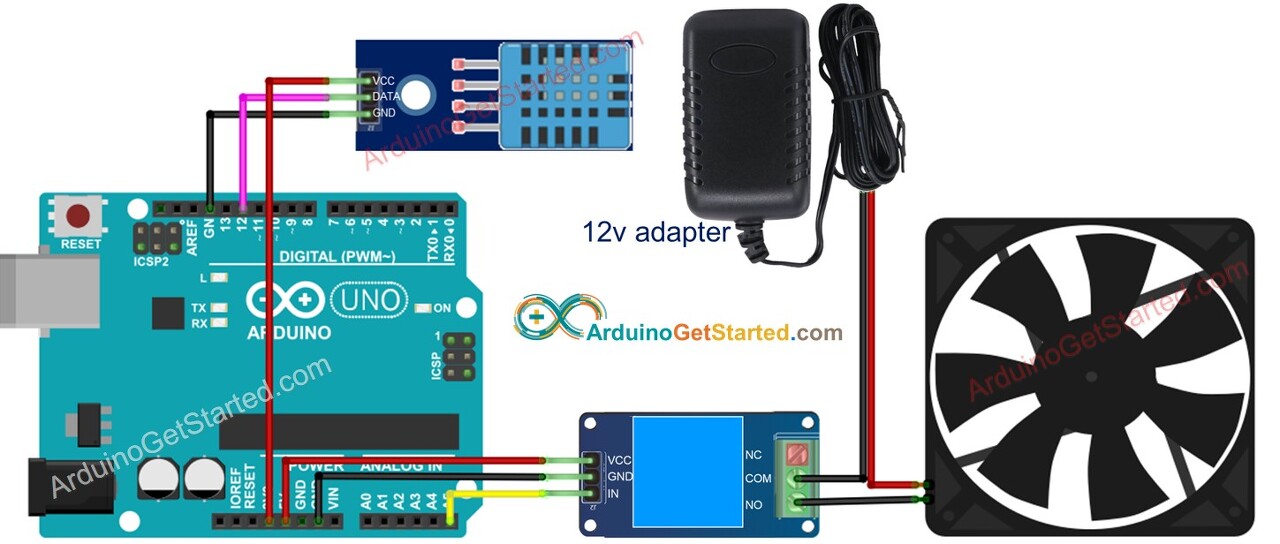
- DHT22 모듈이 있는 배선도

시스템 작동 방식
- Arduino는 온도 센서에서 온도를 읽습니다.
- 온도가 상한 임계값을 초과하면 Arduino가 팬을 켭니다.
- 온도가 낮은 임계값 아래로 떨어지면 Arduino가 팬을 끕니다.
위의 과정을 루프에서 무한반복합니다.
온도가 각각 특정 값 이상 및 이하일 때 팬을 켜고 끄려면
상한 임계값과 하한 임계값을 동일한 값으로 설정하기만 하면 됩니다.
아두이노 코드
DHT11 센서가 있는 냉각 시스템용 Arduino 코드
/*
 * Created by ArduinoGetStarted.com
 *
 * This example code is in the public domain
 *
 * Tutorial page: https://arduinogetstarted.com/tutorials/arduino-cooling-system-using-dht-sensor
 */

#include "DHT.h"

#define RELAY_FAN_PIN A5 // Arduino pin connected to relay which connected to fan
#define DHTPIN 12           // Arduino pin connected to relay which connected to DHT sensor
#define DHTTYPE DHT11

const int TEMP_THRESHOLD_UPPER = 25; // upper threshold of temperature, change to your desire value
const int TEMP_THRESHOLD_LOWER = 20; // lower threshold of temperature, change to your desire value

DHT dht(DHTPIN, DHTTYPE);

float temperature;    // temperature in Celsius

void setup()
{
  Serial.begin(9600); // initialize serial
  dht.begin();        // initialize the sensor
}

void loop()
{
  // wait a few seconds between measurements.
  delay(2000);

  temperature = dht.readTemperature();;  // read temperature in Celsius

  if (isnan(temperature)) {
    Serial.println("Failed to read from DHT sensor!");
  } else {
    if(temperature > TEMP_THRESHOLD_UPPER){
      Serial.println("The fan is turned on");
      digitalWrite(RELAY_FAN_PIN, HIGH); // turn on
    } else if(temperature < TEMP_THRESHOLD_LOWER){
      Serial.println("The fan is turned off");
      digitalWrite(RELAY_FAN_PIN, LOW); // turn on
    }
  }
}
DHT22 센서가 있는 냉각 시스템용 Arduino 코드
/*
 * Created by ArduinoGetStarted.com
 *
 * This example code is in the public domain
 *
 * Tutorial page: https://arduinogetstarted.com/tutorials/arduino-cooling-system-using-dht-sensor
 */

#include "DHT.h"

#define RELAY_FAN_PIN A5 // Arduino pin connected to relay which connected to fan
#define DHTPIN 12           // Arduino pin connected to relay which connected to DHT sensor
#define DHTTYPE DHT22

const int TEMP_THRESHOLD_UPPER = 25; // upper threshold of temperature, change to your desire value
const int TEMP_THRESHOLD_LOWER = 20; // lower threshold of temperature, change to your desire value

DHT dht(DHTPIN, DHTTYPE);

float temperature;    // temperature in Celsius

void setup()
{
  Serial.begin(9600); // initialize serial
  dht.begin();        // initialize the sensor
}

void loop()
{
  // wait a few seconds between measurements.
  delay(2000);

  temperature = dht.readTemperature();;  // read temperature in Celsius

  if (isnan(temperature)) {
    Serial.println("Failed to read from DHT sensor!");
  } else {
    if(temperature > TEMP_THRESHOLD_UPPER){
      Serial.println("The fan is turned on");
      digitalWrite(RELAY_FAN_PIN, HIGH); // turn on
    } else if(temperature < TEMP_THRESHOLD_LOWER){
      Serial.println("The fan is turned off");
      digitalWrite(RELAY_FAN_PIN, LOW); // turn on
    }
  }
}
위의 코드에서 Arduino는 온도가 25°C를 초과하면
팬을 켜고 온도가 20°C 미만이 될 때까지 팬을 유지합니다.
빠른 단계
- USB 케이블을 통해 Arduino를 PC에 연결
- Arduino IDE를 열고 올바른 보드와 포트를 선택하십시오.
- Arduino IDE에서 스케치로 이동 라이브러리 포함 라이브러리 관리
- "DHT"를 검색 한 다음 Adafruit의 DHT 센서 라이브러리를 찾습니다.
- 설치 버튼을 클릭 하여 라이브러리를 설치합니다.
- 다른 라이브러리 종속성을 설치해야 합니다.
- 모두 설치 버튼 모든 라이브러리 종속성을 클릭 합니다 .
- 가지고 있는 센서에 해당하는 위의 코드를 복사하고 Arduino IDE로 엽니다.
- 클릭 업로드 아두 이노 코드를 업로드 아두 이노 IDE 버튼을
- 센서 주변 환경을 더 뜨겁게 또는 더 차갑게 만들기
- 팬 상태 보기
고급 지식
위의 제어 방법은 신호기 또는 "뱅뱅" 컨트롤러라고도 하는 온-오프 컨트롤러입니다.
이 방법은 구현하기가 매우 간단합니다.
PID 제어기라는 대체 방법이 있습니다.
PID 컨트롤러를 사용하면 원하는 온도가 더 안정적이지만
이해하고 구현하기가 매우 어렵습니다.
따라서 PID 제어기는 온도 제어에서 널리 사용되지 않습니다.
[참조번역인용] https://arduinogetstarted.com/tutorials/arduino-cooling-system-using-dht-sensor
Arduino - Cooling System using DHT Sensor | Arduino Tutorial
Learn: How to control temperature using Arduino Uno, fan and DHT11 or DHT22 sensor. The detail instruction, code, wiring diagram, video tutorial, line-by-line code explanation are provided to help you quickly get started with Arduino. Find this and other A
arduinogetstarted.com