RS485 인터페이스의 가장 저렴한 버전은
MAX485 칩셋을 보호하기 위한 "스트래핑"이 없는 보드입니다.
그리고 보드는 RS485 라인에 대한 보호 기능이 없기 때문에 칩이 주기적으로 소손될 수 있습니다.

산업 작업에서는 이전에 논의된 XY-485 또는 XY-017 을 사용하는 것이 좋습니다 .
낙뢰와 같은 다양한 문제로부터 더욱 안전하게 보호됩니다.
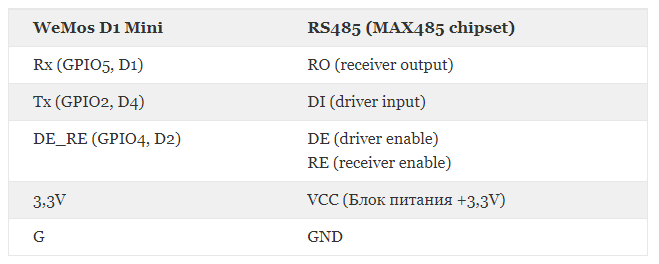
Wemos D1 mini가 있는 RS485 보드의 연결 다이어그램
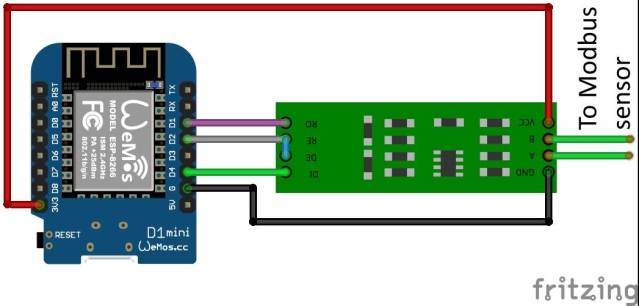
별도의 전원 공급 장치에서 RS485 모듈에 전원을 공급하는 것이 좋습니다!

DE / RE가 있는 RS485 작업을 위한 ESP8266 프로그램
#include "ModbusMaster.h" //https://github.com/4-20ma/ModbusMaster
#include <SoftwareSerial.h> //https://github.com/plerup/espsoftwareserial

/*!
  We're using a MAX485-compatible RS485 Transceiver.
  Rx/Tx is hooked up to the hardware serial port at 'Serial'.
  The Data Enable (DE) and Receiver Enable (RE) pins are hooked up as follows:
*/
#define MAX485_RE_NEG  4 //D2 RS485 has a enable/disable pin to transmit or receive data. Arduino Digital Pin 2 = Rx/Tx 'Enable'; High to Transmit, Low to Receive
#define Slave_ID       1
#define RX_PIN      5 //D1
#define TX_PIN      2  //D4

// instantiate ModbusMaster object
ModbusMaster modbus;
SoftwareSerial swSer(RX_PIN, TX_PIN, false, 128);

void preTransmission()
{
  digitalWrite(MAX485_RE_NEG, HIGH); //Switch to transmit data
}

void postTransmission()
{
  digitalWrite(MAX485_RE_NEG, LOW); //Switch to receive data
}

void setup()
{
  pinMode(MAX485_RE_NEG, OUTPUT);

  // Init in receive mode
  digitalWrite(MAX485_RE_NEG, LOW);

  // Modbus communication runs at 9600 baud
  Serial.begin(9600, SERIAL_8N1);

  // Modbus slave ID 1
  swSer.begin(9600);
  modbus.begin(Slave_ID, swSer);

  // Callbacks allow us to configure the RS485 transceiver correctly
  modbus.preTransmission(preTransmission);
  modbus.postTransmission(postTransmission);
}

long lastMillis = 0;
void loop()
{
  long currentMillis = millis();
  if (currentMillis - lastMillis > 1000)
  {
    ESP.wdtDisable();
    uint8_t result = modbus.readInputRegisters(0x01, 2);
    ESP.wdtEnable(1);

    if (getResultMsg(&modbus, result))
    {
      Serial.println();

      double res_dbl = modbus.getResponseBuffer(0) / 10;
      String res = "Temperature2: " + String(res_dbl) + " C\r\n";
      res_dbl = modbus.getResponseBuffer(1) / 10;
      res += "Humidity2: " + String(res_dbl) + " %";
      Serial.println(res);
    }
    lastMillis = currentMillis;
  }
}

bool getResultMsg(ModbusMaster *node, uint8_t result)
{
  String tmpstr2 = "\r\n";

  switch (result)
  {
  case node->ku8MBSuccess:
    return true;
    break;
  case node->ku8MBIllegalFunction:
    tmpstr2 += "Illegal Function";
    break;
  case node->ku8MBIllegalDataAddress:
    tmpstr2 += "Illegal Data Address";
    break;
  case node->ku8MBIllegalDataValue:
    tmpstr2 += "Illegal Data Value";
    break;
  case node->ku8MBSlaveDeviceFailure:
    tmpstr2 += "Slave Device Failure";
    break;
  case node->ku8MBInvalidSlaveID:
    tmpstr2 += "Invalid Slave ID";
    break;
  case node->ku8MBInvalidFunction:
    tmpstr2 += "Invalid Function";
    break;
  case node->ku8MBResponseTimedOut:
    tmpstr2 += "Response Timed Out";
    break;
  case node->ku8MBInvalidCRC:
    tmpstr2 += "Invalid CRC";
    break;
  default:
    tmpstr2 += "Unknown error: " + String(result);
    break;
  }
  Serial.println(tmpstr2);
  return false;
}'MODBUS' 카테고리의 다른 글
| Modbus TCP/IP (0) | 2021.11.12 |
|---|---|
| 완전한 Modbus 가이드 (0) | 2021.09.06 |
| Arduino / ESP8266 / ESP32를 위한 저렴한 RS-485 인터페이스 (0) | 2021.09.02 |
| Modbus Configuration files for ESP8266/Arduino (0) | 2021.08.24 |
| MODBUS Protocol (0) | 2021.08.17 |