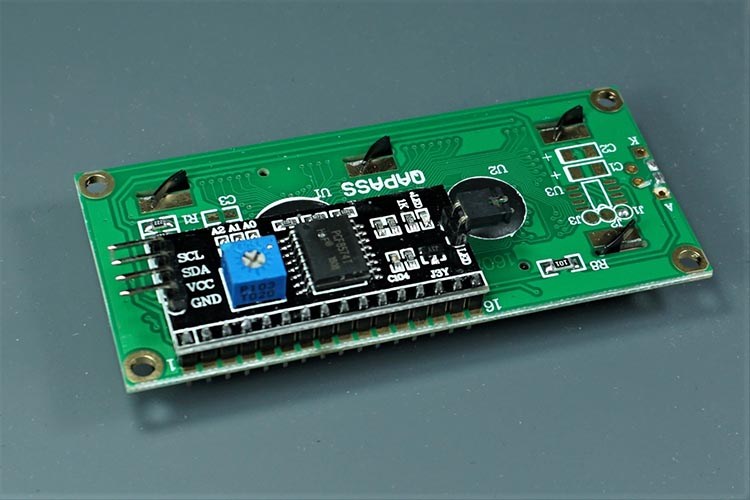
이 디스플레이는 I2C 통신을 사용하므로 배선이 정말 간단합니다.
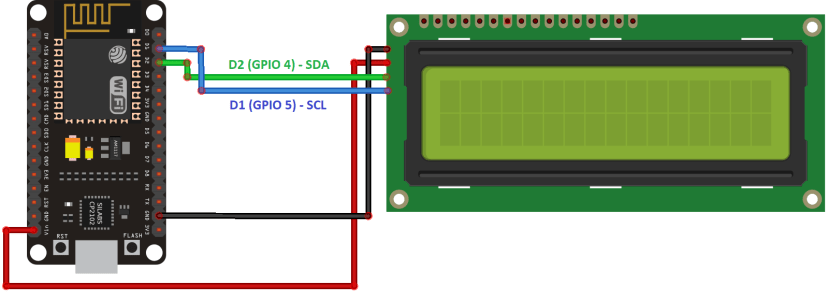
ESP8266에 LCD 배선하기
다음 회로도에 따라 LCD를 ESP8266에 연결할 수도 있습니다.
ESP8266 기본 I2C 핀(GPIO 4 그리고 GPIO 5).
다음 표를 참조로 사용할 수도 있습니다.
| I2C LCD | ESP32 |
| 접지 | GND |
| VCC | VIN |
| SDA | GPIO 21 |
| SCL | GPIO 22 |
아두이노 IDE 준비
프로젝트를 진행하기 전에 Arduino IDE에 ESP32 또는 ESP8266 애드온을 설치해야 합니다.
ESP32가 포함된 Arduino IDE
다음 가이드 중 하나에 따라 ESP32에서 작동하도록 Arduino IDE를 준비하십시오.
ESP8266이 포함된 Arduino IDE
Arduino IDE에 ESP8266 애드온을 설치하려면 다음 자습서를 읽으십시오 .
Arduino IDE에 ESP8266 보드를 설치하는 방법 .
LiquidCrystal_I2C 라이브러리 설치
I2C LCD와 함께 작동하는 여러 라이브러리가 있습니다.
우리는 Marco Schwartz의 이 라이브러리를 사용 하고 있습니다 .
라이브러리를 설치하려면 다음 단계를 따르십시오.
- 여기를 클릭하여 LiquidCrystal_I2C 라이브러리를 다운로드하십시오 .
다운로드에 .zip 폴더가 있어야 합니다. - .zip 폴더의 압축을 풀면 LiquidCrystal_I2C-master 폴더가 있어야 합니다.
- 다음에서 폴더 이름 바꾸기
LiquidCrystal_I2C-마스터에 LiquidCrystal_I2C - LiquidCrystal_I2C 폴더를 Arduino IDE 설치 라이브러리 폴더로 이동 합니다.
- 마지막으로 Arduino IDE를 다시 엽니다.
LCD 주소 가져오기
/*********
  Rui Santos
  Complete project details at https://randomnerdtutorials.com
*********/

#include <Wire.h>

void setup() {
  Wire.begin();
  Serial.begin(115200);
  Serial.println("\nI2C Scanner");
}

void loop() {
  byte error, address;
  int nDevices;
  Serial.println("Scanning...");
  nDevices = 0;
  for(address = 1; address < 127; address++ ) {
    Wire.beginTransmission(address);
    error = Wire.endTransmission();
    if (error == 0) {
      Serial.print("I2C device found at address 0x");
      if (address<16) {
        Serial.print("0");
      }
      Serial.println(address,HEX);
      nDevices++;
    }
    else if (error==4) {
      Serial.print("Unknow error at address 0x");
      if (address<16) {
        Serial.print("0");
      }
      Serial.println(address,HEX);
    }
  }
  if (nDevices == 0) {
    Serial.println("No I2C devices found\n");
  }
  else {
    Serial.println("done\n");
  }
  delay(5000);
}
코드를 업로드한 후 115200의 전송 속도로 직렬 모니터를 엽니다.
ESP32 EN 버튼을 누릅니다. I2C 주소는 직렬 모니터에 표시되어야 합니다.
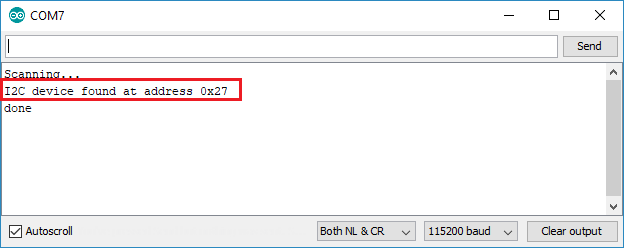
이 경우 주소는 0x27 입니다. 비슷한 16×2 디스플레이를 사용하는 경우 동일한 주소를 얻을 수 있습니다.
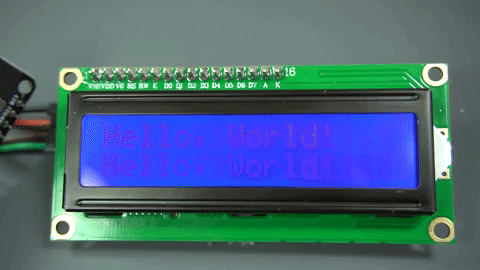
LCD에 정적 텍스트 표시
LCD에 정적 텍스트를 표시하는 것은 매우 간단합니다.
화면에서 문자를 표시할 위치를 선택한 다음 디스플레이에 메시지를 보내기만 하면 됩니다.
다음은 " Hello, World! ".
/*********
  Rui Santos
  Complete project details at https://randomnerdtutorials.com
*********/

#include <LiquidCrystal_I2C.h>

// set the LCD number of columns and rows
int lcdColumns = 16;
int lcdRows = 2;

// set LCD address, number of columns and rows
// if you don't know your display address, run an I2C scanner sketch
LiquidCrystal_I2C lcd(0x27, lcdColumns, lcdRows);

void setup(){
  // initialize LCD
  lcd.init();
  // turn on LCD backlight
  lcd.backlight();
}

void loop(){
  // set cursor to first column, first row
  lcd.setCursor(0, 0);
  // print message
  lcd.print("Hello, World!");
  delay(1000);
  // clears the display to print new message
  lcd.clear();
  // set cursor to first column, second row
  lcd.setCursor(0,1);
  lcd.print("Hello, World!");
  delay(1000);
  lcd.clear();
}
첫 번째 행에 메시지를 표시한 다음 두 번째 행에 표시합니다.
이 간단한 스케치눈 당신에게 LiquidCrystal_I2C library의 가장 유용하고 중요한 기능을 보여줍니다
따라서 코드가 어떻게 작동하는지 간단히 살펴보겠습니다.
코드 작동 방식
먼저 다음을 포함해야 합니다.LiquidCrystal_I2C labrary
#include <LiquidCrystal_I2C.h>다음 두 줄은 LCD 디스플레이의 열과 행 수를 설정합니다.
다른 크기의 디스플레이를 사용하는 경우 해당 변수를 수정해야 합니다.
int lcdColumns = 16;
int lcdRows = 2;
그런 다음 표시 주소, 열 수 및 행 수를 설정해야 합니다.
이전 단계에서 찾은 디스플레이 주소를 사용해야 합니다.
LiquidCrystal_I2C lcd(0x27, lcdColumns, lcdRows);setup() 에서 먼저 다음을 사용하여 디스플레이를 초기화합니다. init() 메서더
lcd.init();그런 다음 LCD 백라이트를 켜서 디스플레이의 문자를 읽을 수 있습니다.
lcd.backlight();화면에 메시지를 표시하려면 먼저 메시지를 기록할 위치에 커서를 설정해야 합니다.
다음 줄은 커서를 첫 번째 열, 첫 번째 행으로 설정합니다.
lcd.setCursor(0, 0);참고 : 0은 첫 번째 열에 해당하고 1은 두 번째 열에 해당하는 식으로…
그런 다음 마지막으로 다음을 사용하여 디스플레이에 메시지를 인쇄할 수 있습니다. print() 메서더
lcd.print("Hello, World!");1초 정도 기다린 다음 로 디스플레이를 청소하십시오. clear() 메서더
lcd.clear();그런 다음 커서를 새 위치(첫 번째 열, 두 번째 행)로 설정합니다.
lcd.setCursor(0,1);
그런 다음 프로세스가 반복됩니다.
따라서 디스플레이에서 조작하고 쓰는 기능에 대한 요약은 다음과 같습니다.
- lcd.init(): 디스플레이 초기화
- lcd.backlight(): LCD 백라이트를 켭니다.
- lcd.setCursor(int 열, int 행): 커서를 지정된 열과 행으로 설정합니다.
- lcd.print(문자열 메시지): 디스플레이에 메시지를 표시합니다.
- lcd.clear(): 디스플레이를 지웁니다
이 예는 16자 이하의 정적 텍스트를 표시하는 데 적합합니다.
LCD에 스크롤 텍스트 표시
LCD의 스크롤 텍스트는 16자보다 긴 메시지를 표시하려는 경우에 특히 유용합니다.
라이브러리에는 텍스트를 스크롤할 수 있는 내장 기능이 있습니다.
그러나 많은 사람들이 다음과 같은 이유로 이러한 기능에 문제를 경험합니다.
- 이 함수는 두 행의 텍스트를 스크롤합니다. 따라서 고정 행과 스크롤 행을 가질 수 없습니다.
- 16자보다 긴 메시지를 표시하려고 하면 제대로 작동하지 않습니다.
따라서 프로젝트에서 더 긴 메시지를 스크롤하는 데
사용할 수 있는 기능이 있는 샘플 스케치를 만들었습니다.
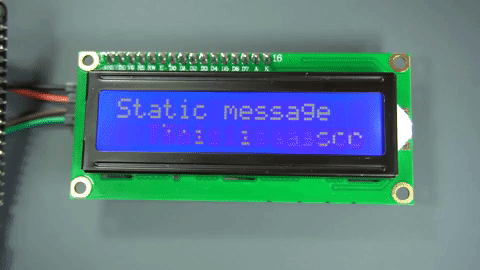
다음 스케치는 첫 번째 행에 정적 메시지를 표시하고
두 번째 행에 16자보다 긴 스크롤 메시지를 표시합니다.
/*********
  Rui Santos
  Complete project details at https://randomnerdtutorials.com
*********/

#include <LiquidCrystal_I2C.h>

// set the LCD number of columns and rows
int lcdColumns = 16;
int lcdRows = 2;

// set LCD address, number of columns and rows
// if you don't know your display address, run an I2C scanner sketch
LiquidCrystal_I2C lcd(0x27, lcdColumns, lcdRows);

String messageStatic = "Static message";
String messageToScroll = "This is a scrolling message with more than 16 characters";

// Function to scroll text
// The function acepts the following arguments:
// row: row number where the text will be displayed
// message: message to scroll
// delayTime: delay between each character shifting
// lcdColumns: number of columns of your LCD
void scrollText(int row, String message, int delayTime, int lcdColumns) {
  for (int i=0; i < lcdColumns; i++) {
    message = " " + message;
  }
  message = message + " ";
  for (int pos = 0; pos < message.length(); pos++) {
    lcd.setCursor(0, row);
    lcd.print(message.substring(pos, pos + lcdColumns));
    delay(delayTime);
  }
}

void setup(){
  // initialize LCD
  lcd.init();
  // turn on LCD backlight
  lcd.backlight();
}

void loop(){
  // set cursor to first column, first row
  lcd.setCursor(0, 0);
  // print static message
  lcd.print(messageStatic);
  // print scrolling message
  scrollText(1, messageToScroll, 250, lcdColumns);
}
이전 섹션을 읽은 후에는 이 스케치가 어떻게 작동하는지 잘 알고 있을 것이므로
새로 생성된 함수를 살펴보겠습니다.: scrollText()
void scrollText(int row, String message, int delayTime, int lcdColumns) {
  for (int i=0; i < lcdColumns; i++) {
    message = " " + message;
  }
  message = message + " ";
  for (int pos = 0; pos < message.length(); pos++) {
    lcd.setCursor(0, row);
    lcd.print(message.substring(pos, pos + lcdColumns));
    delay(delayTime);
  }
}
이 함수를 사용하려면 4개의 인수를 전달해야 합니다.
- row: 텍스트가 표시될 행 번호
- message: 스크롤하라는 메시지
- delayTime: 각 문자 이동 사이의 지연. 지연 시간이 길수록 텍스트 이동이 느려지고 지연 시간이 짧을수록 텍스트 이동이 빨라집니다.
- lcdColumns: LCD의 열 수
코드에서 사용하는 방법은 다음과 같습니다. scrollText() 함수:
scrollText(1, messageToScroll, 250, lcdColumns);messageToScroll 변수는 250ms의 지연 시간으로 두 번째 행(1은 두 번째 행에 해당)에 표시됩니다
(GIF 이미지의 속도는 1.5배 향상됨).
사용자 지정 문자 표시
16×2 LCD에는 문자를 표시할 수 있는 32개의 블록이 있습니다.
각 블록은 5×8 작은 픽셀로 구성됩니다.
각 작은 픽셀의 상태를 정의하여 사용자 정의 문자를 표시할 수 있습니다.
이를 위해 각 픽셀의 상태를 유지하는 바이트 변수를 생성할 수 있습니다.
사용자 정의 캐릭터 를 생성하려면 여기 로 이동 하여
캐릭터에 대한 바이트 변수를 생성 할 수 있습니다 .
예를 들어, 심장:
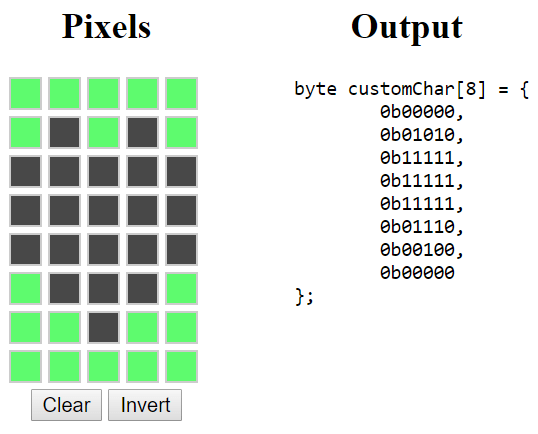
바이트 변수를 코드에 복사합니다( setup() 전에). 당신은 그것을 호출 할 수 있습니다heart:
byte heart[8] = {
  0b00000,
  0b01010,
  0b11111,
  0b11111,
  0b11111,
  0b01110,
  0b00100,
  0b00000
};
그런 다음, setup() 에서 createChar()함수를 사용하여 사용자 정의 캐릭터를 만듭니다. .
이 함수는 다음과 같이 char 및 char 변수를 할당할 위치를 인수로 받습니다.
lcd.createChar(0, heart);그런 다음, loop() 문자를 표시할 위치로 커서를 설정합니다.
lcd.setCursor(0, 0);사용 쓰다()문자를 표시하기위해 write() 메서드를 사용합니다.
다음과 같이 캐릭터가 할당된 위치를 전달합니다.
lcd.write(0);마무리
요약하면, 이 튜토리얼에서 우리는 Arduino IDE와 함께
ESP32/ESP8266과 함께 I2C LCD 디스플레이를 사용하는 방법을 보여주었습니다:
정적 텍스트, 스크롤링 텍스트 및 사용자 정의 문자를 표시하는 방법.
이 튜토리얼은 Arduino 보드에서도 작동하므로 Arduino I2C 핀을 사용하려면
핀 할당을 변경하기만 하면 됩니다.
ESP32가 포함된 다른 자습서가 있습니다. 유용할 수 있습니다.
- 다중 DS18B20 온도 센서가 있는 ESP32
- MicroSD 카드에 ESP32 데이터 로깅 온도
- DC 모터 및 L298N 모터 드라이버가 있는 ESP32 – 속도 및 방향 제어
- 더 많은 ESP32 튜토리얼
[참조번역인용] https://randomnerdtutorials.com/esp32-esp8266-i2c-lcd-arduino-ide/
I2C LCD with ESP32 on Arduino IDE - ESP8266 compatible | Random Nerd Tutorials
Learn how to use the I2C LCD (Liquid Crystal Display) with the ESP32 or ESP8266 using Arduino IDE. We'll show you how to wire the display and write code.
randomnerdtutorials.com
'ESP32' 카테고리의 다른 글
| ESP32 HTTP GET and HTTP POST with Arduino IDE (JSON, URL Encoded, Text) (0) | 2021.08.16 |
|---|---|
| ESP32 Deep Sleep with Arduino IDE and Wake Up Sources (0) | 2021.08.16 |
| ESP32 with PIR Motion Sensor using Interrupts and Timers (0) | 2021.08.16 |
| ESP32 Deep Sleep with Arduino IDE and Wake Up Sources (0) | 2021.08.16 |
| ESP32/ESP8266 Insert Data into MySQL Database using PHP and Arduino IDE (0) | 2021.08.16 |