이 가이드에서는 Arduino IDE가 있는 ESP32 보드로
HTTP GET 및 HTTP POST 요청을 만드는 방법을 배웁니다.
값을 얻는 방법, JSON 개체 게시, URL 인코딩 요청 등에 대한 예제를 다룹니다.
권장 사항: ESP8266 NodeMCU HTTP GET 및 HTTP POST(Arduino IDE 포함)(JSON, URL 인코딩, 텍스트)
HTTP 요청 방법: GET 대 POST
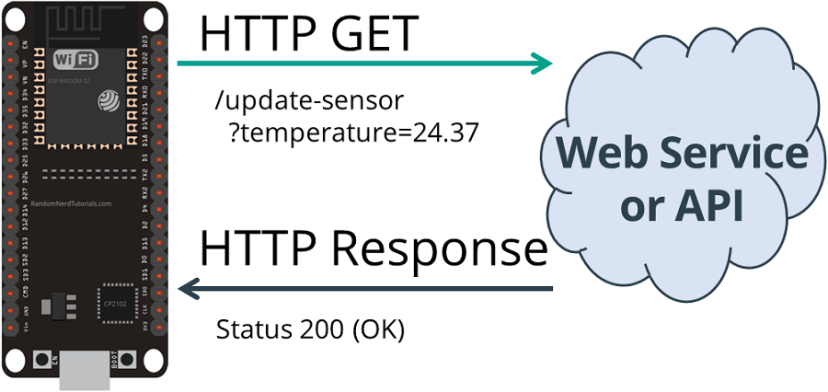
HTTP(Hypertext Transfer Protocol)는
클라이언트와 서버 간의 요청-응답 프로토콜로 작동합니다. 다음은 예입니다.
- ESP32(클라이언트)는 Node-RED(서버)를 실행하는 Raspberry Pi에 HTTP 요청을 제출합니다.
- 서버는 ESP32(클라이언트)에 응답을 반환합니다.
- 마지막으로 응답에는 요청에 대한 상태 정보가 포함되며 요청된 콘텐츠도 포함될 수 있습니다.
HTTP GET
GET 은 지정된 리소스에서 데이터를 요청하는 데 사용됩니다.
API에서 값을 가져오는 데 자주 사용됩니다.
예를 들어 다음을 가질 수 있습니다.
GET /update-sensor?temperature=value1쿼리 문자열( name = temperature 및 value = value1 )은 HTTP GET 요청의 URL로 전송됩니다.
또는 간단한 요청을 사용하여 값이나 JSON 객체를 반환할 수 있습니다. 예를 들면 다음과 같습니다.
GET /get-sensor(HTTP GET을 사용하면 URL 요청의 모든 사람이 데이터를 볼 수 있습니다.)
HTTP POST
POST 는 리소스를 생성/업데이트하기 위해 서버에 데이터를 보내는 데 사용됩니다.
예를 들어 센서 판독값을 서버에 게시합니다.
POST를 통해 서버로 전송된 데이터는 HTTP 요청의 요청 본문에 저장됩니다.
POST /update-sensor HTTP/1.1
Host: example.com
api_key=api&sensor_name=name&temperature=value1&humidity=value2&pressure=value3
Content-Type: application/x-www-form-urlencoded
본문 요청에서 JSON 객체를 보낼 수도 있습니다.
POST /update-sensor HTTP/1.1
Host: example.com
{api_key: "api", sensor_name: "name", temperature: value1, humidity: value2, pressure: value3}
Content-Type: application/json
(HTTP POST를 사용하면 데이터가 URL 요청에 표시되지 않습니다.
그러나 암호화되지 않은 경우 요청 본문에 계속 표시됩니다.)
ESP32를 사용한 HTTP GET/POST
이 가이드에서는 다음 시나리오를 살펴봅니다.
- ESP32 HTTP GET: URL의 값 또는 쿼리
- ESP32 HTTP GET: JSON 데이터 개체 또는 일반 텍스트
- ESP32 HTTP POST: 인코딩된 URL, JSON 데이터 개체, 일반 텍스트
전제 조건
이 튜토리얼을 진행하기 전에 다음 전제조건을 완료했는지 확인하십시오.
아두이노 IDE
우리는 Arduino IDE를 사용하여 ESP32를 프로그래밍할 것이므로
ESP32 애드온이 설치되어 있는지 확인하십시오.
Arduino_JSON 라이브러리
Arduino_JSON 라이브러리도 설치해야 합니다 .
Arduino IDE 라이브러리 관리자에서 이 라이브러리를 설치할 수 있습니다.
Sketch > Include Library > Manage Libraries 로 이동하여
다음과 같이 라이브러리 이름을 검색합니다.

필요한 부품
이 자습서에는 다음 부품이 필요합니다.
- ESP32 ( 최고의 ESP32 개발 보드 읽기 )
- 라즈베리 파이 보드 ( 최고의 라즈베리 파이 스타터 키트 읽기 )
- MicroSD 카드 – 16GB Class10
- 라즈베리 파이 전원 공급 장치(5V 2.5A)
- 점퍼 와이어
- 브레드보드
위의 링크를 사용하거나 MakerAdvisor.com/tools 로 직접 이동 하여 프로젝트에 필요한 모든 부품을 최적의 가격으로 찾을 수 있습니다!
Node-RED 준비(선택 사항)
Raspberry Pi 및 Node-RED를 사용하여 웹 서비스(예: API) 역할을 하는 웹 서비스를 생성합니다.
기본적으로 값을 가져오거나 업데이트하기 위해 Raspberry Pi에
HTTP GET 및 HTTP POST 요청을 수행합니다. 다른 웹 서비스를 사용할 수 있습니다.
Node-RED가 설치되어 있지 않으면 다음 자습서를 따르십시오.
Raspberry Pi에서 Node-RED를 실행 중인 상태에서
Raspberry Pi IP 주소로 이동한 다음 :1880을 입력합니다.
http://raspberry-pi-ip-address:1880Node-RED 인터페이스가 열려야 합니다. 최종 흐름을 간단히 가져올 수 있습니다.

메뉴 > 가져오기로 이동 하고 다음을 클립보드에 복사하여 Node-RED 흐름을 만듭니다.
[{"id":"599740b7.efde9","type":"http response","z":"b01416d3.f69f38","name":"","statusCode":"200","headers":{},"x":420,"y":689,"wires":[]},{"id":"1618a829.76f638","type":"json","z":"b01416d3.f69f38","name":"","property":"payload","action":"obj","pretty":true,"x":410,"y":809,"wires":[["d0089cc7.d25ac"]]},{"id":"c7410fa2.1c2fa","type":"debug","z":"b01416d3.f69f38","name":"","active":true,"tosidebar":true,"console":false,"tostatus":false,"complete":"false","x":850,"y":709,"wires":[]},{"id":"75a22f74.f1aba","type":"ui_text","z":"b01416d3.f69f38","group":"2b7ac01b.fc984","order":1,"width":0,"height":0,"name":"","label":"Sensor Name","format":"{{msg.payload}}","layout":"row-spread","x":860,"y":769,"wires":[]},{"id":"1c8f9093.8bc2bf","type":"ui_gauge","z":"b01416d3.f69f38","name":"","group":"2b7ac01b.fc984","order":2,"width":0,"height":0,"gtype":"gage","title":"Temperature","label":"ºC","format":"{{value}}","min":0,"max":"38","colors":["#00b500","#e6e600","#ca3838"],"seg1":"","seg2":"","x":850,"y":829,"wires":[]},{"id":"a5bd2706.54e108","type":"ui_gauge","z":"b01416d3.f69f38","name":"","group":"2b7ac01b.fc984","order":3,"width":0,"height":0,"gtype":"gage","title":"Humidity","label":"%","format":"{{value}}","min":0,"max":"100","colors":["#0080ff","#0062c4","#002f5e"],"seg1":"","seg2":"","x":840,"y":889,"wires":[]},{"id":"105ac2cc.7b3cfd","type":"ui_gauge","z":"b01416d3.f69f38","name":"","group":"2b7ac01b.fc984","order":4,"width":0,"height":0,"gtype":"gage","title":"Pressure","label":"hPa","format":"{{value}}","min":0,"max":"1200","colors":["#b366ff","#8000ff","#440088"],"seg1":"","seg2":"","x":840,"y":949,"wires":[]},{"id":"d0089cc7.d25ac","type":"function","z":"b01416d3.f69f38","name":"JSON or URL Encoded","func":"var msg0 = { payload: msg.payload.api_key };\nvar msg1 = { payload: msg.payload.sensor };\nvar msg2 = { payload: msg.payload.value1 };\nvar msg3 = { payload: msg.payload.value2 };\nvar msg4 = { payload: msg.payload.value3 };\n\nreturn [msg0, msg1, msg2, msg3, msg4];","outputs":5,"noerr":0,"x":610,"y":809,"wires":[["c7410fa2.1c2fa"],["75a22f74.f1aba"],["1c8f9093.8bc2bf"],["a5bd2706.54e108"],["105ac2cc.7b3cfd"]]},{"id":"5d9ab0d2.66b92","type":"http in","z":"b01416d3.f69f38","name":"","url":"update-sensor","method":"post","upload":false,"swaggerDoc":"","x":200,"y":740,"wires":[["599740b7.efde9","c7410fa2.1c2fa","1618a829.76f638"]]},{"id":"7f5cf345.63f56c","type":"http response","z":"b01416d3.f69f38","name":"","statusCode":"200","headers":{},"x":540,"y":420,"wires":[]},{"id":"6530621.95b429c","type":"http in","z":"b01416d3.f69f38","name":"","url":"/get-sensor","method":"get","upload":false,"swaggerDoc":"","x":180,"y":600,"wires":[["9471d1a0.68588"]]},{"id":"5ddc9f47.4b555","type":"http response","z":"b01416d3.f69f38","name":"","statusCode":"200","headers":{},"x":540,"y":560,"wires":[]},{"id":"9471d1a0.68588","type":"function","z":"b01416d3.f69f38","name":"","func":"msg.payload = {\"value1\":24.25, \"value2\":49.54, \"value3\":1005.14};\nreturn msg;","outputs":1,"noerr":0,"x":350,"y":600,"wires":[["5ddc9f47.4b555","13aea59.7430e5a"]]},{"id":"13aea59.7430e5a","type":"debug","z":"b01416d3.f69f38","name":"","active":true,"tosidebar":true,"console":false,"tostatus":false,"complete":"false","x":550,"y":628,"wires":[]},{"id":"e71c7a7d.e7c598","type":"debug","z":"b01416d3.f69f38","name":"","active":true,"tosidebar":true,"console":false,"tostatus":false,"complete":"false","x":550,"y":500,"wires":[]},{"id":"c7807102.3f433","type":"http in","z":"b01416d3.f69f38","name":"","url":"/update-sensor","method":"get","upload":false,"swaggerDoc":"","x":190,"y":460,"wires":[["60410cde.562a34"]]},{"id":"60410cde.562a34","type":"function","z":"b01416d3.f69f38","name":"","func":"msg.payload = msg.payload.temperature;\nreturn msg;","outputs":1,"noerr":0,"x":390,"y":460,"wires":[["e71c7a7d.e7c598","7f5cf345.63f56c"]]},{"id":"2b7ac01b.fc984","type":"ui_group","z":"","name":"SENSORS","tab":"99ab8dc5.f435c","disp":true,"width":"6","collapse":false},{"id":"99ab8dc5.f435c","type":"ui_tab","z":"","name":"HTTP","icon":"dashboard","order":1,"disabled":false,"hidden":false}]기타 웹 서비스 또는 API
이 가이드에서는 ESP32 수행 HTTP는 노드 RED에 요청,하지만
당신은 ThingSpeak, IFTTT.com (웹 후크 서비스), OpenWeatherMap.org 같은
다른 서비스와 이러한 예 사용할 수있는 PHP 서버 ...
이 설명서에 제시된 모든 예 등, 다른 API와도 작동합니다.
요약하면 이 가이드를 모든 서비스와 호환되도록 하려면 서비스 API 문서를 검색해야 합니다.
그런 다음 서버 이름(URL 또는 IP 주소)과 요청에서 보낼 매개변수(URL 경로 또는 요청 본문)가 필요합니다.
마지막으로 사용하려는 API와 통합하도록 예제를 수정합니다.
1. ESP32 HTTP GET: URL의 값 또는 쿼리
첫 번째 예에서 ESP32는 HTTP GET 요청을 만들어 서비스의 판독값을 업데이트합니다.
이 유형의 요청은 값을 필터링하거나 값을 요청하거나 JSON 객체를 반환하는 데에도 사용할 수 있습니다.
Arduino IDE로 ESP32 HTTP GET 코드 작성
필요한 보드 애드온 및 라이브러리를 설치한 후 다음 코드를 Arduino IDE에 복사하되 아직 업로드하지 마십시오. 작동하려면 몇 가지를 변경해야 합니다.
/*
  Rui Santos
  Complete project details at Complete project details at https://RandomNerdTutorials.com/esp32-http-get-post-arduino/

  Permission is hereby granted, free of charge, to any person obtaining a copy
  of this software and associated documentation files.

  The above copyright notice and this permission notice shall be included in all
  copies or substantial portions of the Software.
*/

#include <WiFi.h>
#include <HTTPClient.h>

const char* ssid = "REPLACE_WITH_YOUR_SSID";
const char* password = "REPLACE_WITH_YOUR_PASSWORD";

//Your Domain name with URL path or IP address with path
String serverName = "http://192.168.1.106:1880/update-sensor";

// the following variables are unsigned longs because the time, measured in
// milliseconds, will quickly become a bigger number than can be stored in an int.
unsigned long lastTime = 0;
// Timer set to 10 minutes (600000)
//unsigned long timerDelay = 600000;
// Set timer to 5 seconds (5000)
unsigned long timerDelay = 5000;

void setup() {
  Serial.begin(115200);

  WiFi.begin(ssid, password);
  Serial.println("Connecting");
  while(WiFi.status() != WL_CONNECTED) {
    delay(500);
    Serial.print(".");
  }
  Serial.println("");
  Serial.print("Connected to WiFi network with IP Address: ");
  Serial.println(WiFi.localIP());

  Serial.println("Timer set to 5 seconds (timerDelay variable), it will take 5 seconds before publishing the first reading.");
}

void loop() {
  //Send an HTTP POST request every 10 minutes
  if ((millis() - lastTime) > timerDelay) {
    //Check WiFi connection status
    if(WiFi.status()== WL_CONNECTED){
      HTTPClient http;

      String serverPath = serverName + "?temperature=24.37";

      // Your Domain name with URL path or IP address with path
      http.begin(serverPath.c_str());

      // Send HTTP GET request
      int httpResponseCode = http.GET();

      if (httpResponseCode>0) {
        Serial.print("HTTP Response code: ");
        Serial.println(httpResponseCode);
        String payload = http.getString();
        Serial.println(payload);
      }
      else {
        Serial.print("Error code: ");
        Serial.println(httpResponseCode);
      }
      // Free resources
      http.end();
    }
    else {
      Serial.println("WiFi Disconnected");
    }
    lastTime = millis();
  }
}
네트워크 자격 증명 설정
네트워크 자격 증명으로 다음 줄을 수정합니다:
SSID 및 암호. 코드는 어디를 변경해야 하는지 잘 설명되어 있습니다.
// Replace with your network credentials
const char* ssid     = "REPLACE_WITH_YOUR_SSID";
const char* password = "REPLACE_WITH_YOUR_PASSWORD";
serverName 설정
ESP가 판독값을 자체 서버에 게시할 수 있도록 도메인 이름 또는 Node-RED IP 주소도 입력해야 합니다.
String serverName = "http://192.168.1.106:1880/update-sensor";이제 보드에 코드를 업로드하면 바로 작동합니다.
HTTP GET 요청을 만드는 방법을 배우려면 다음 섹션을 읽으십시오.
HTTP GET 요청
loop()에서 우리는 실제로 5초마다 샘플 데이터를 요청하는 HTTP GET request를 작성합니다
String serverPath = serverName + "?temperature=24.37";

// Your Domain name with URL path or IP address with path
http.begin(serverPath.c_str());

// Send HTTP GET request
int httpResponseCode = http.GET();
ESP32는 새로운 온도로 센서 필드를 업데이트하기 위해 다음 URL에서 새로운 요청을 합니다.
http://192.168.1.106:1880/update-sensor?temperature=24.37
그런 다음 다음 코드 줄은 서버의 HTTP 응답을 저장합니다.
if (httpResponseCode>0) {
  Serial.print("HTTP Response code: ");
  Serial.println(httpResponseCode);
  String payload = http.getString();
  Serial.println(payload);
}
else {
  Serial.print("Error code: ");
  Serial.println(httpResponseCode);
}
데모
보드에서 새 스케치를 실행하고 Node-RED 디버그 창을 엽니다.
샘플 값이 성공적으로 인쇄되는 것을 볼 수 있습니다(24.37).

2. ESP32 HTTP GET: JSON 데이터 객체 또는 일반 텍스트
다음 예제에서는 HTTP GET 요청을 만들어 JSON 객체를 가져와
ESP32로 디코딩하는 방법을 보여줍니다. 많은 API가 JSON 형식으로 데이터를 반환합니다.

다음 스케치를 Arduino IDE에 복사합니다(SSID 및 비밀번호 입력).
/*
  Rui Santos
  Complete project details at Complete project details at https://RandomNerdTutorials.com/esp32-http-get-post-arduino/

  Permission is hereby granted, free of charge, to any person obtaining a copy
  of this software and associated documentation files.

  The above copyright notice and this permission notice shall be included in all
  copies or substantial portions of the Software.
*/

#include <WiFi.h>
#include <HTTPClient.h>
#include <Arduino_JSON.h>

const char* ssid = "REPLACE_WITH_YOUR_SSID";
const char* password = "REPLACE_WITH_YOUR_PASSWORD";

//Your Domain name with URL path or IP address with path
const char* serverName = "http://192.168.1.106:1880/get-sensor";

// the following variables are unsigned longs because the time, measured in
// milliseconds, will quickly become a bigger number than can be stored in an int.
unsigned long lastTime = 0;
// Timer set to 10 minutes (600000)
//unsigned long timerDelay = 600000;
// Set timer to 5 seconds (5000)
unsigned long timerDelay = 5000;

String sensorReadings;
float sensorReadingsArr[3];

void setup() {
  Serial.begin(115200);

  WiFi.begin(ssid, password);
  Serial.println("Connecting");
  while(WiFi.status() != WL_CONNECTED) {
    delay(500);
    Serial.print(".");
  }
  Serial.println("");
  Serial.print("Connected to WiFi network with IP Address: ");
  Serial.println(WiFi.localIP());

  Serial.println("Timer set to 5 seconds (timerDelay variable), it will take 5 seconds before publishing the first reading.");
}

void loop() {
  //Send an HTTP POST request every 10 minutes
  if ((millis() - lastTime) > timerDelay) {
    //Check WiFi connection status
    if(WiFi.status()== WL_CONNECTED){

      sensorReadings = httpGETRequest(serverName);
      Serial.println(sensorReadings);
      JSONVar myObject = JSON.parse(sensorReadings);

      // JSON.typeof(jsonVar) can be used to get the type of the var
      if (JSON.typeof(myObject) == "undefined") {
        Serial.println("Parsing input failed!");
        return;
      }

      Serial.print("JSON object = ");
      Serial.println(myObject);

      // myObject.keys() can be used to get an array of all the keys in the object
      JSONVar keys = myObject.keys();

      for (int i = 0; i < keys.length(); i++) {
        JSONVar value = myObject[keys[i]];
        Serial.print(keys[i]);
        Serial.print(" = ");
        Serial.println(value);
        sensorReadingsArr[i] = double(value);
      }
      Serial.print("1 = ");
      Serial.println(sensorReadingsArr[0]);
      Serial.print("2 = ");
      Serial.println(sensorReadingsArr[1]);
      Serial.print("3 = ");
      Serial.println(sensorReadingsArr[2]);
    }
    else {
      Serial.println("WiFi Disconnected");
    }
    lastTime = millis();
  }
}

String httpGETRequest(const char* serverName) {
  WiFiClient client;
  HTTPClient http;

  // Your Domain name with URL path or IP address with path
  http.begin(client, serverName);

  // Send HTTP POST request
  int httpResponseCode = http.GET();

  String payload = "{}";

  if (httpResponseCode>0) {
    Serial.print("HTTP Response code: ");
    Serial.println(httpResponseCode);
    payload = http.getString();
  }
  else {
    Serial.print("Error code: ");
    Serial.println(httpResponseCode);
  }
  // Free resources
  http.end();

  return payload;
}
serverName 설정
ESP가 JSON 개체에서 검색할 센서 판독값을 요청하도록 도메인 이름 또는 Node-RED IP 주소를 입력합니다.
String serverName = "http://192.168.1.106:1880/get-sensor";이제 보드에 코드를 업로드합니다.
HTTP GET 요청(JSON 객체)
loop() 에서 HTTP GET request를 만드는 함수 httpGETRequest() 를 소환 합니다:
sensorReadings = httpGETRequest(serverName);httpGETRequest()함수는 Node-RED 주소 http://192.168.1.106:1880/get-sensor에 요청 하고
JSON 객체가 있는 문자열을 반환 받습니다.
String httpGETRequest(const char* serverName) {
  HTTPClient http;

  // Your IP address with path or Domain name with URL path
  http.begin(serverName);

  // Send HTTP POST request
  int httpResponseCode = http.GET();

  String payload = "{}";

  if (httpResponseCode>0) {
    Serial.print("HTTP Response code: ");
    Serial.println(httpResponseCode);
    payload = http.getString();
  }
  else {
    Serial.print("Error code: ");
    Serial.println(httpResponseCode);
  }
  // Free resources
  http.end();

  return payload;
}
JSON 객체 디코딩
JSONVar myObject = JSON.parse(sensorReadings);

// JSON.typeof(jsonVar) can be used to get the type of the var
if (JSON.typeof(myObject) == "undefined") {
  Serial.println("Parsing input failed!");
  return;
}

Serial.print("JSON object = ");
Serial.println(myObject);

// myObject.keys() can be used to get an array of all the keys in the object
JSONVar keys = myObject.keys();

for (int i = 0; i < keys.length(); i++) {
  JSONVar value = myObject[keys[i]];
  Serial.print(keys[i]);
  Serial.print(" = ");
  Serial.println(value);
  sensorReadingsArr[i] = double(value);
}
Serial.print("1 = ");
Serial.println(sensorReadingsArr[0]);
Serial.print("2 = ");
Serial.println(sensorReadingsArr[1]);
Serial.print("3 = ");
Serial.println(sensorReadingsArr[2]);
HTTP GET 데모
코드를 업로드한 후 Arduino IDE를 열면 다음 JSON 데이터가 수신되는 것을 볼 수 있습니다.
{"value1":24.25,"value2":49.54,"value3":1005.14}그런 다음 Arduino IDE 직렬 모니터에서 디코딩된 JSON 개체를 인쇄합니다.

디버깅 목적으로 요청된 정보는 Node-RED 디버그 창에도 인쇄됩니다.

3. ESP32 HTTP POST: URL 인코딩, JSON 데이터 개체, 일반 텍스트
마지막으로 ESP32로 HTTP POST 요청을 하는 방법을 배우게 됩니다.
이 예에서 ESP32는 URL 인코딩, JSON 객체 또는 일반 텍스트의 세 가지 다른 유형의
본문 요청을 사용하여 HTTP POST 요청을 만들 수 있습니다.
이것은 가장 일반적인 방법이며 대부분의 API 또는 웹 서비스와 통합되어야 합니다.

다음 스케치를 Arduino IDE에 복사합니다(SSID 및 비밀번호 입력).
/*
  Rui Santos
  Complete project details at Complete project details at https://RandomNerdTutorials.com/esp32-http-get-post-arduino/

  Permission is hereby granted, free of charge, to any person obtaining a copy
  of this software and associated documentation files.

  The above copyright notice and this permission notice shall be included in all
  copies or substantial portions of the Software.
*/

#include <WiFi.h>
#include <HTTPClient.h>

const char* ssid = "REPLACE_WITH_YOUR_SSID";
const char* password = "REPLACE_WITH_YOUR_PASSWORD";

//Your Domain name with URL path or IP address with path
const char* serverName = "http://192.168.1.106:1880/update-sensor";

// the following variables are unsigned longs because the time, measured in
// milliseconds, will quickly become a bigger number than can be stored in an int.
unsigned long lastTime = 0;
// Timer set to 10 minutes (600000)
//unsigned long timerDelay = 600000;
// Set timer to 5 seconds (5000)
unsigned long timerDelay = 5000;

void setup() {
  Serial.begin(115200);

  WiFi.begin(ssid, password);
  Serial.println("Connecting");
  while(WiFi.status() != WL_CONNECTED) {
    delay(500);
    Serial.print(".");
  }
  Serial.println("");
  Serial.print("Connected to WiFi network with IP Address: ");
  Serial.println(WiFi.localIP());

  Serial.println("Timer set to 5 seconds (timerDelay variable), it will take 5 seconds before publishing the first reading.");
}

void loop() {
  //Send an HTTP POST request every 10 minutes
  if ((millis() - lastTime) > timerDelay) {
    //Check WiFi connection status
    if(WiFi.status()== WL_CONNECTED){
      WiFiClient client;
      HTTPClient http;

      // Your Domain name with URL path or IP address with path
      http.begin(client, serverName);

      // Specify content-type header
      http.addHeader("Content-Type", "application/x-www-form-urlencoded");
      // Data to send with HTTP POST
      String httpRequestData = "api_key=tPmAT5Ab3j7F9&sensor=BME280&value1=24.25&value2=49.54&value3=1005.14";
      // Send HTTP POST request
      int httpResponseCode = http.POST(httpRequestData);

      // If you need an HTTP request with a content type: application/json, use the following:
      //http.addHeader("Content-Type", "application/json");
      //int httpResponseCode = http.POST("{\"api_key\":\"tPmAT5Ab3j7F9\",\"sensor\":\"BME280\",\"value1\":\"24.25\",\"value2\":\"49.54\",\"value3\":\"1005.14\"}");

      // If you need an HTTP request with a content type: text/plain
      //http.addHeader("Content-Type", "text/plain");
      //int httpResponseCode = http.POST("Hello, World!");

      Serial.print("HTTP Response code: ");
      Serial.println(httpResponseCode);

      // Free resources
      http.end();
    }
    else {
      Serial.println("WiFi Disconnected");
    }
    lastTime = millis();
  }
}
serverName 설정
ESP가 샘플 센서 판독값을 게시할 수 있도록 도메인 이름 또는 Node-RED IP 주소를 입력합니다.
String serverName = "http://192.168.1.106:1880/update-sensor";이제 보드에 코드를 업로드합니다.
HTTP POST URL 인코딩
다음과 같이 인코딩된 URL 유형의 HTTP POST 요청을 만들려면
POST /update-sensor HTTP/1.1
Host: 192.168.1.106:1880
api_key=tPmAT5Ab3j7F9&sensor=BME280&value1=24.25&value2=49.54&value3=1005.14
Content-Type: application/x-www-form-urlencoded
Arduino 코드에서 다음을 실행해야 합니다.
// Your Domain name with URL path or IP address with path
http.begin(serverName);

// Specify content-type header
http.addHeader("Content-Type", "application/x-www-form-urlencoded");

// Data to send with HTTP POST
String httpRequestData = "api_key=tPmAT5Ab3j7F9&sensor=BME280&value1=24.25&value2=49.54&value3=1005.14";

// Send HTTP POST request
int httpResponseCode = http.POST(httpRequestData);
HTTP POST JSON 객체
또는 JSON 객체로 HTTP POST 요청을 하려는 경우:
POST /update-sensor HTTP/1.1
Host: example.com
{api_key: "tPmAT5Ab3j7F9", sensor_name: "BME280", temperature: 24.25; humidity: 49.54; pressure: 1005.14}
Content-Type: application/json
다음 스니펫을 사용하세요.
http.addHeader("Content-Type", "application/json");

int httpResponseCode = http.POST("{\"api_key\":\"tPmAT5Ab3j7F9\",\"sensor\":\"BME280\",\"value1\":\"24.25\",\"value2\":\"49.54\",\"value3\":\"1005.14\"}");
HTTP 일반 텍스트
일반 텍스트 또는 값을 보내려면 다음을 사용하십시오.
http.addHeader("Content-Type", "text/plain");
int httpResponseCode = http.POST("Hello, World!");
참고: 사용 중인 Node-RED 흐름(웹 서비스)은 일반 텍스트를 수신하도록 설정되지 않았지만
통합하려는 API가 일반 텍스트 또는 값만 허용하는 경우 이전 스니펫을 사용할 수 있습니다.
HTTP POST 데모
Node-RED 디버그 창에서 ESP가 5초마다 HTTP POST 요청을 하고 있음을 볼 수 있습니다.

그리고 이 예에서 해당 값은 3 Gauge에도 전송되고 Node-RED 대시보드에 표시됩니다.
http://raspberry-pi-ip-address:1880/ui
마무리
이 자습서에서는 HTTP GET 및 HTTP POST 요청을 사용하여
ESP32를 온라인 서비스와 통합하는 방법을 배웠습니다.
HTTP GET 및 HTTP POST는
대부분의 웹 서비스 및 API에서 일반적으로 사용됩니다.
이는 프로젝트에서 다음과 같은 작업에 유용할 수 있습니다.
센서 판독값을 IFTTT, ThingSpeak와 같은 웹 서비스에 게시합니다.
ESP32 또는 Raspberry Pi 웹 서버 또는 자체 서버로,
인터넷이나 데이터베이스 등에서 데이터를 요청할 수 있습니다.
ESP8266 보드를 사용하는 경우
ESP8266 NodeMCU HTTP GET 및 HTTP Post Requests 가이드를 읽어보세요 .
[출처번역인용] https://randomnerdtutorials.com/esp32-http-get-post-arduino/
ESP32 HTTP GET and HTTP POST with Arduino IDE | Random Nerd Tutorials
Learn how to make HTTP GET and HTTP POST Requests with the ESP32 board with Arduino IDE. How to get values, post JSON data objects, URL encoded requests, etc.
randomnerdtutorials.com
'ESP32' 카테고리의 다른 글
| ESP32 NTP Client-Server: Get Date and Time (Arduino IDE) (0) | 2021.08.16 |
|---|---|
| DIY Cloud Weather Station with ESP32/ESP8266 (MySQL Database and PHP) (0) | 2021.08.16 |
| ESP32 Deep Sleep with Arduino IDE and Wake Up Sources (0) | 2021.08.16 |
| Wiring the LCD to the ESP32 (0) | 2021.08.16 |
| ESP32 with PIR Motion Sensor using Interrupts and Timers (0) | 2021.08.16 |