클라우드 기상 관측소 대시보드를 구축하여
전 세계 어디에서나 ESP32 또는 ESP8266 센서 판독값을 시각화합니다.
게이지와 테이블에 표시된 센서 데이터를 볼 수 있습니다.
ESP32 또는 ESP8266은 데이터를 MySQL 데이터베이스에 삽입하기 위해
PHP 스크립트에 HTTP POST 요청을 보냅니다.

이전에는 센서 판독값을 데이터베이스에 저장하고
자신의 서버를 사용하여 어디에서나 액세스할 수 있는 테이블 이나 차트 에 표시했습니다 .
이제 몇 단계 더 나아가 웹 페이지에 정보를 추가하기로 결정했습니다.
최신 온도 및 습도 판독값과 정의할 수 있는 판독값의 양에서
최소, 최대 및 평균 판독값에 대한 일부 통계를 표시하기 위해
두 개의 게이지를 추가했습니다.
또한 테이블에 모든 최신 판독값을 시각화하고 표시할 판독값 수를 선택할 수 있습니다.
이 프로젝트를 빌드하려면 다음 기술을 사용합니다.
- Arduino IDE로 프로그래밍된 ESP32 또는 ESP8266
- 호스팅 서버 및 도메인 이름
- MySQL에 데이터를 삽입하고 웹 페이지에 표시하는 PHP 스크립트
- 판독값을 저장할 MySQL 데이터베이스
0. 소스코드 다운로드
이 프로젝트에는 다음 파일이 필요합니다.
- 테이블 생성을 위한 SQL 쿼리: SensorData_Table.sql
- 데이터베이스 판독값 삽입 및 액세스: esp-database.php
- HTTP Post 요청 처리: esp-post-data.php
- 웹 페이지 스타일을 지정하는 CSS 파일: esp-style.css
- 센서 판독값 표시: esp-weather-station.php
- ESP32/ESP8266용 Arduino 스케치: ESP_HTTP_POST_MySQL.ino
- 모든 프로젝트 파일 다운로드
1. PHP 애플리케이션 및 MySQL 데이터베이스 호스팅
이 프로젝트의 목표는 ESP32 또는 ESP8266의 센서 판독값을 저장할 수 있는
고유한 도메인 이름과 호스팅 계정을 갖는 것입니다.
자신의 서버 도메인에 액세스하여 전 세계 어디에서나 판독값을 시각화할 수 있습니다.
다음은 프로젝트 작동 방식에 대한 높은 수준의 개요입니다.
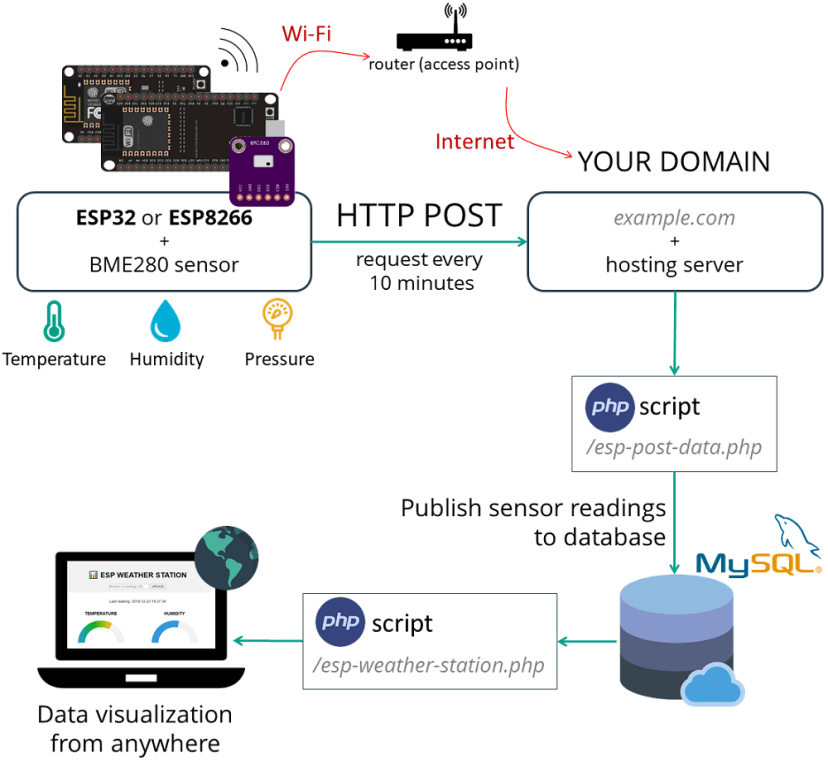
- 센서 판독값을 자체 서버로 보내는 ESP32 또는 ESP8266이 있습니다.
이를 위해 보드가 라우터에 연결되어 있습니다. - 서버에는 MySQL 데이터베이스에 판독값을 저장할 수 있는 PHP 스크립트가 있습니다.
- 그런 다음 다른 PHP 스크립트가 게이지, 테이블 및 기타 모든 정보가 포함된 웹 페이지를 표시합니다.
- 마지막으로 자신의 도메인 이름에 액세스하여 전 세계 어디에서나 판독값을 시각화할 수 있습니다.
참고 : 당신은 또한 실행할 수있는 LAMP (리눅스, 아파치, MySQL은, PHP) 서버 에
라즈베리 파이에 로컬 네트워크에서 데이터에 액세스 .
그러나 이 자습서의 목적은 전 세계 어디에서나 액세스할 수 있는
자체 도메인 이름으로 판독값을 게시하는 것입니다.
이를 통해 타사 IoT 플랫폼에 의존하지 않고도 ESP 판독값에 쉽게 액세스할 수 있습니다.
2. MySQL 데이터베이스 준비
호스팅 계정에 가입하고 도메인 이름을 설정 한 후 cPanel 또는 유사한 대시보드에 로그인할 수 있습니다. 그런 다음 다음 단계에 따라 데이터베이스, 사용자 이름, 암호 및 SQL 테이블을 만듭니다.
데이터베이스 및 사용자 생성
1. 검색창에 "database"를 입력하고 "MySQL Database Wizard"를 선택합니다.
2. 원하는 데이터베이스 이름을 입력합니다.
제 경우 데이터베이스 이름은esp_data. 그런 다음 "다음 단계" 버튼을 누릅니다.
참고: 나중에 호스트가 제공하는 접두사와 함께 데이터베이스 이름을 사용해야 합니다
(위 스크린샷에서 내 데이터베이스 접두사는 흐릿함).
나는 그것을 다음과 같이 언급 할 것이다.example_esp_data 지금부터.
3. 데이터베이스 사용자 이름을 입력하고 암호를 설정합니다.
나중에 PHP 코드와 데이터베이스 연결을 설정하는 데 필요하기 때문에 이러한 세부 정보를 모두 저장해야 합니다.
새 데이터베이스와 사용자가 성공적으로 생성되었습니다. 나중에 필요하므로 이제 모든 세부 정보를 저장하십시오.
- 데이터베이스 이름 : example_esp_data
- 사용자 이름 : example_esp_board
- 비밀번호 : 귀하의 비밀번호
SQL 테이블 생성
데이터베이스와 사용자를 생성한 후 cPanel 대시보드로 돌아가 "phpMyAdmin"을 검색합니다.
왼쪽 사이드바에서 데이터베이스 이름을 선택합니다. example_esp_data "SQL" 탭을 엽니다.
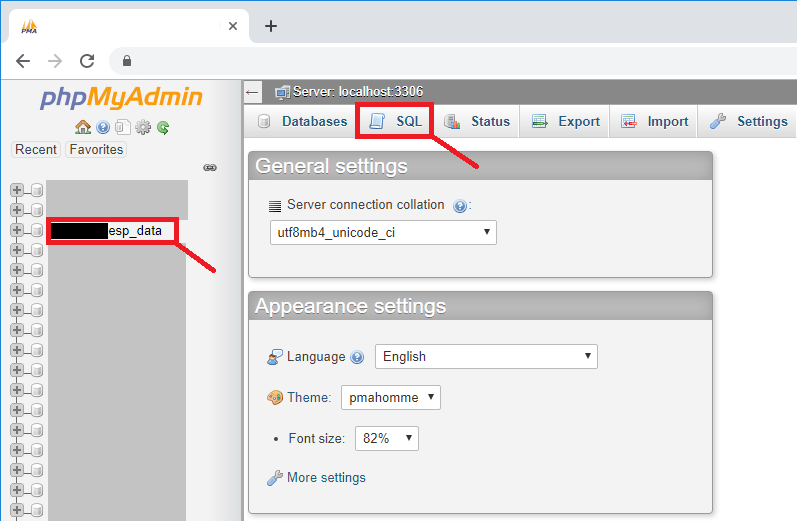
중요: 열었는지 확인하십시오.example_esp_data데이터 베이스. 그런 다음 SQL 탭을 클릭합니다.
이 정확한 단계를 따르지 않고 SQL 쿼리를 실행하지 않으면
잘못된 데이터베이스에 테이블을 생성할 수 있습니다.
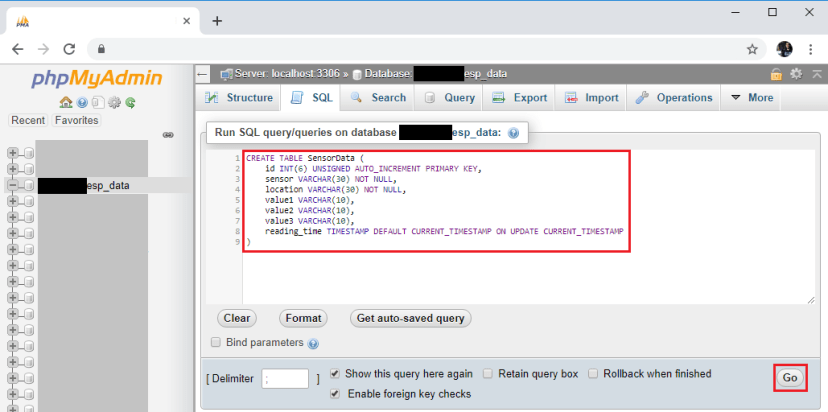
다음 스니펫에서 SQL 쿼리를 복사합니다.
CREATE TABLE SensorData (
    id INT(6) UNSIGNED AUTO_INCREMENT PRIMARY KEY,
    sensor VARCHAR(30) NOT NULL,
    location VARCHAR(30) NOT NULL,
    value1 VARCHAR(10),
    value2 VARCHAR(10),
    value3 VARCHAR(10),
    reading_time TIMESTAMP DEFAULT CURRENT_TIMESTAMP ON UPDATE CURRENT_TIMESTAMP
)
SQL 쿼리 필드(빨간색 사각형으로 강조 표시됨)에 붙여넣고 "이동" 버튼을 눌러 테이블을 만듭니다.
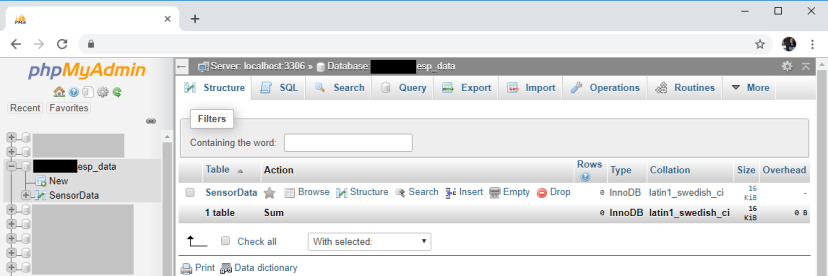
그런 다음 example_esp_data 안에 새로 생성된 SensorData테이블이 표시되어야 합니다.
3. PHP 스크립트 HTTP POST
– MySQL 데이터베이스에서 데이터 수신 및 삽입
이 섹션에서는 ESP32 또는 ESP8266에서 들어오는 요청을 수신하고
데이터를 MySQL 데이터베이스에 삽입하는 역할을 하는 PHP 스크립트를 만들 것입니다.
cPanel과 함께 호스팅 제공업체를 사용하는 경우 "파일 관리자"를 검색할 수 있습니다.
그런 다음 public_html 옵션을 선택하고 "+ 파일" 버튼을 눌러 새 .php 파일 을 만듭니다 .

참고: 이 자습서를 따르고 있고 PHP 또는 MySQL에 익숙하지 않은 경우
이러한 정확한 파일을 만드는 것이 좋습니다.
그렇지 않으면 다른 URL 경로와 함께 제공된 ESP 스케치를 수정해야 합니다.
다음 과 같은 정확한 이름과 확장자를 사용하여 esp-post-data.php을
/public_html에 만듭니다 .
새로 생성된 파일( esp-post-data.php )을 편집하고 다음 스니펫을 복사합니다.
<!--
  Rui Santos
  Complete project details at https://RandomNerdTutorials.com/cloud-weather-station-esp32-esp8266/

  Permission is hereby granted, free of charge, to any person obtaining a copy
  of this software and associated documentation files.

  The above copyright notice and this permission notice shall be included in all
  copies or substantial portions of the Software.
-->
<?php
  include_once('esp-database.php');

  // Keep this API Key value to be compatible with the ESP code provided in the project page. If you change this value, the ESP sketch needs to match
  $api_key_value = "tPmAT5Ab3j7F9";

  $api_key= $sensor = $location = $value1 = $value2 = $value3 = "";

  if ($_SERVER["REQUEST_METHOD"] == "POST") {
    $api_key = test_input($_POST["api_key"]);
    if($api_key == $api_key_value) {
      $sensor = test_input($_POST["sensor"]);
      $location = test_input($_POST["location"]);
      $value1 = test_input($_POST["value1"]);
      $value2 = test_input($_POST["value2"]);
      $value3 = test_input($_POST["value3"]);

      $result = insertReading($sensor, $location, $value1, $value2, $value3);
      echo $result;
    }
    else {
      echo "Wrong API Key provided.";
    }
  }
  else {
    echo "No data posted with HTTP POST.";
  }

  function test_input($data) {
    $data = trim($data);
    $data = stripslashes($data);
    $data = htmlspecialchars($data);
    return $data;
  }
4. 데이터베이스 기능을 위한 PHP 스크립트
/public_html 에 데이터베이스의 데이터 삽입 및 액세스를 담당 하는 새 파일을 만듭니다 .
파일 이름: esp-database.php
<!--
  Rui Santos
  Complete project details at https://RandomNerdTutorials.com/cloud-weather-station-esp32-esp8266/

  Permission is hereby granted, free of charge, to any person obtaining a copy
  of this software and associated documentation files.

  The above copyright notice and this permission notice shall be included in all
  copies or substantial portions of the Software.
-->
<?php
  $servername = "localhost";

  // REPLACE with your Database name
  $dbname = "REPLACE_WITH_YOUR_DATABASE_NAME";
  // REPLACE with Database user
  $username = "REPLACE_WITH_YOUR_USERNAME";
  // REPLACE with Database user password
  $password = "REPLACE_WITH_YOUR_PASSWORD";

  function insertReading($sensor, $location, $value1, $value2, $value3) {
    global $servername, $username, $password, $dbname;

    // Create connection
    $conn = new mysqli($servername, $username, $password, $dbname);
    // Check connection
    if ($conn->connect_error) {
      die("Connection failed: " . $conn->connect_error);
    }

    $sql = "INSERT INTO SensorData (sensor, location, value1, value2, value3)
    VALUES ('" . $sensor . "', '" . $location . "', '" . $value1 . "', '" . $value2 . "', '" . $value3 . "')";

    if ($conn->query($sql) === TRUE) {
      return "New record created successfully";
    }
    else {
      return "Error: " . $sql . "<br>" . $conn->error;
    }
    $conn->close();
  }

  function getAllReadings($limit) {
    global $servername, $username, $password, $dbname;

    // Create connection
    $conn = new mysqli($servername, $username, $password, $dbname);
    // Check connection
    if ($conn->connect_error) {
      die("Connection failed: " . $conn->connect_error);
    }

    $sql = "SELECT id, sensor, location, value1, value2, value3, reading_time FROM SensorData order by reading_time desc limit " . $limit;
    if ($result = $conn->query($sql)) {
      return $result;
    }
    else {
      return false;
    }
    $conn->close();
  }
  function getLastReadings() {
    global $servername, $username, $password, $dbname;

    // Create connection
    $conn = new mysqli($servername, $username, $password, $dbname);
    // Check connection
    if ($conn->connect_error) {
      die("Connection failed: " . $conn->connect_error);
    }

    $sql = "SELECT id, sensor, location, value1, value2, value3, reading_time FROM SensorData order by reading_time desc limit 1" ;
    if ($result = $conn->query($sql)) {
      return $result->fetch_assoc();
    }
    else {
      return false;
    }
    $conn->close();
  }

  function minReading($limit, $value) {
     global $servername, $username, $password, $dbname;

    // Create connection
    $conn = new mysqli($servername, $username, $password, $dbname);
    // Check connection
    if ($conn->connect_error) {
      die("Connection failed: " . $conn->connect_error);
    }

    $sql = "SELECT MIN(" . $value . ") AS min_amount FROM (SELECT " . $value . " FROM SensorData order by reading_time desc limit " . $limit . ") AS min";
    if ($result = $conn->query($sql)) {
      return $result->fetch_assoc();
    }
    else {
      return false;
    }
    $conn->close();
  }

  function maxReading($limit, $value) {
     global $servername, $username, $password, $dbname;

    // Create connection
    $conn = new mysqli($servername, $username, $password, $dbname);
    // Check connection
    if ($conn->connect_error) {
      die("Connection failed: " . $conn->connect_error);
    }

    $sql = "SELECT MAX(" . $value . ") AS max_amount FROM (SELECT " . $value . " FROM SensorData order by reading_time desc limit " . $limit . ") AS max";
    if ($result = $conn->query($sql)) {
      return $result->fetch_assoc();
    }
    else {
      return false;
    }
    $conn->close();
  }

  function avgReading($limit, $value) {
     global $servername, $username, $password, $dbname;

    // Create connection
    $conn = new mysqli($servername, $username, $password, $dbname);
    // Check connection
    if ($conn->connect_error) {
      die("Connection failed: " . $conn->connect_error);
    }

    $sql = "SELECT AVG(" . $value . ") AS avg_amount FROM (SELECT " . $value . " FROM SensorData order by reading_time desc limit " . $limit . ") AS avg";
    if ($result = $conn->query($sql)) {
      return $result->fetch_assoc();
    }
    else {
      return false;
    }
    $conn->close();
  }
?>
파일을 저장하기 전에 수정해야 합니다. $dbname, $username 그리고 $password
// Your Database name
$dbname = "example_esp_data";
// Your Database user
$username = "example_esp_board";
// Your Database user password
$password = "YOUR_USER_PASSWORD";
데이터베이스 이름, 사용자 이름 및 암호를 추가한 후
파일을 저장하고 이 자습서를 계속합니다.
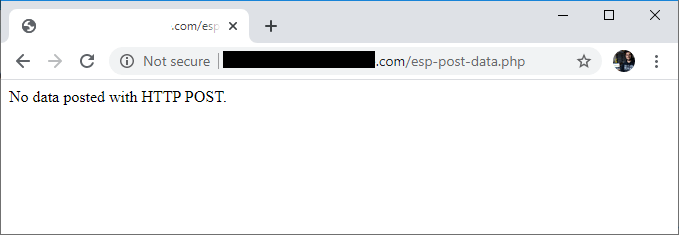
다음 URL 경로에서 도메인 이름에 액세스하려고 하면 다음이 표시됩니다.
http://example.com/esp-post-data.php
5. PHP 스크립트 – 게이지 및 테이블에 데이터베이스 판독값 표시
대시보드의 스타일을 지정하려면 esp-style.css 라는 이름을 지정하기 위해 CSS 파일도 추가해야 합니다 .
해당 CSS를 파일에 복사하고 저장합니다.
/**
  Rui Santos
  Complete project details at https://RandomNerdTutorials.com/cloud-weather-station-esp32-esp8266/

  Permission is hereby granted, free of charge, to any person obtaining a copy
  of this software and associated documentation files.

  The above copyright notice and this permission notice shall be included in all
  copies or substantial portions of the Software.
**/
body {
    width: 60%;
    margin: auto;
    text-align: center;
    font-family: Arial;
    top: 50%;
    left: 50%;
}

@media screen and (max-width: 800px) {
    body {
        width: 100%;
    }
}

table {
    margin-left: auto;
    margin-right: auto;
}

div {
    margin-left: auto;
    margin-right: auto;
}

h2 { font-size: 2.5rem; }

.header {
	 padding: 1rem;
	 margin: 0 0 2rem 0;
	 background: #f2f2f2;
}

h1 {
    font-size: 2rem;
    font-family: Arial, sans-serif;
    text-align: center;
    text-transform: uppercase;
}

.content {
    display: flex;
}

@media screen and (max-width: 500px) /* Mobile */ {
    .content {
        flex-direction: column;
    }
}

.mask {
    position: relative;
    overflow: hidden;
    display: block;
    width: 12.5rem;
    height: 6.25rem;
    margin: 1.25rem;
}

.semi-circle {
    position: relative;
    display: block;
    width: 12.5rem;
    height: 6.25rem;
    background: linear-gradient(to right, #3498db 0%, #05b027 33%, #f1c40f 70%, #c0392b 100%);
    border-radius: 50% 50% 50% 50% / 100% 100% 0% 0%;
}

.semi-circle::before {
    content: "";
    position: absolute;
    bottom: 0;
    left: 50%;
    z-index: 2;
    display: block;
    width: 8.75rem;
    height: 4.375rem;
    margin-left: -4.375rem;
    background: #fff;
    border-radius: 50% 50% 50% 50% / 100% 100% 0% 0%;
}

.semi-circle--mask {
    position: absolute;
    top: 0;
    left: 0;
    width: 12.5rem;
    height: 12.5rem;
    background: transparent;
    transform: rotate(120deg) translate3d(0, 0, 0);
    transform-origin: center center;
    backface-visibility: hidden;
    transition: all 0.3s ease-in-out;
}

.semi-circle--mask::before {
    content: "";
    position: absolute;
    top: 0;
    left: 0%;
    z-index: 2;
    display: block;
    width: 12.625rem;
    height: 6.375rem;
    margin: -1px 0 0 -1px;
    background: #f2f2f2;
    border-radius: 50% 50% 50% 50% / 100% 100% 0% 0%;
}

.gauge--2 .semi-circle { background: #3498db; }

.gauge--2 .semi-circle--mask { transform: rotate(20deg) translate3d(0, 0, 0); }

#tableReadings { border-collapse: collapse; }

#tableReadings td, #tableReadings th {
    border: 1px solid #ddd;
    padding: 10px;
}

#tableReadings tr:nth-child(even){ background-color: #f2f2f2; }

#tableReadings tr:hover { background-color: #ddd; }

#tableReadings th {
    padding: 10px;
    background-color: #2f4468;
    color: white;
}
마지막으로 /public_html 디렉토리에 웹 페이지의 모든 데이터베이스 콘텐츠를 표시할
또 다른 PHP 파일을 만듭니다 . 새 파일 이름: esp-weather-station.php
새로 생성된 파일( esp-weather-station.php )을 편집하고 다음 코드를 복사합니다.
<!--
Rui Santos
Complete project details at https://RandomNerdTutorials.com/cloud-weather-station-esp32-esp8266/
Permission is hereby granted, free of charge, to any person obtaining a copy
of this software and associated documentation files.
The above copyright notice and this permission notice shall be included in all
copies or substantial portions of the Software.
-->
<?php
include_once('esp-database.php');
if ($_GET["readingsCount"]){
$data = $_GET["readingsCount"];
$data = trim($data);
$data = stripslashes($data);
$data = htmlspecialchars($data);
$readings_count = $_GET["readingsCount"];
}
// default readings count set to 20
else {
$readings_count = 20;
}
$last_reading = getLastReadings();
$last_reading_temp = $last_reading["value1"];
$last_reading_humi = $last_reading["value2"];
$last_reading_time = $last_reading["reading_time"];
// Uncomment to set timezone to - 1 hour (you can change 1 to any number)
//$last_reading_time = date("Y-m-d H:i:s", strtotime("$last_reading_time - 1 hours"));
// Uncomment to set timezone to + 7 hours (you can change 7 to any number)
//$last_reading_time = date("Y-m-d H:i:s", strtotime("$last_reading_time + 7 hours"));
$min_temp = minReading($readings_count, 'value1');
$max_temp = maxReading($readings_count, 'value1');
$avg_temp = avgReading($readings_count, 'value1');
$min_humi = minReading($readings_count, 'value2');
$max_humi = maxReading($readings_count, 'value2');
$avg_humi = avgReading($readings_count, 'value2');
?>
<!DOCTYPE html>
<html>
<head><meta http-equiv="Content-Type" content="text/html; charset=utf-8">
<link rel="stylesheet" type="text/css" href="esp-style.css">
<meta name="viewport" content="width=device-width, initial-scale=1">
<script src="https://ajax.googleapis.com/ajax/libs/jquery/3.4.1/jquery.min.js"></script>
</head>
<header class="header">
<h1> ESP Weather Station</h1>
<form method="get">
<input type="number" name="readingsCount" min="1" placeholder="Number of readings (<?php echo $readings_count; ?>)">
<input type="submit" value="UPDATE">
</form>
</header>
<body>
<p>Last reading: <?php echo $last_reading_time; ?></p>
<section class="content">
<div class="box gauge--1">
<h3>TEMPERATURE</h3>
<div class="mask">
<div class="semi-circle"></div>
<div class="semi-circle--mask"></div>
</div>
<p style="font-size: 30px;" id="temp">--</p>
<table cellspacing="5" cellpadding="5">
<tr>
<th colspan="3">Temperature <?php echo $readings_count; ?> readings</th>
</tr>
<tr>
<td>Min</td>
<td>Max</td>
<td>Average</td>
</tr>
<tr>
<td><?php echo $min_temp['min_amount']; ?> °C</td>
<td><?php echo $max_temp['max_amount']; ?> °C</td>
<td><?php echo round($avg_temp['avg_amount'], 2); ?> °C</td>
</tr>
</table>
</div>
<div class="box gauge--2">
<h3>HUMIDITY</h3>
<div class="mask">
<div class="semi-circle"></div>
<div class="semi-circle--mask"></div>
</div>
<p style="font-size: 30px;" id="humi">--</p>
<table cellspacing="5" cellpadding="5">
<tr>
<th colspan="3">Humidity <?php echo $readings_count; ?> readings</th>
</tr>
<tr>
<td>Min</td>
<td>Max</td>
<td>Average</td>
</tr>
<tr>
<td><?php echo $min_humi['min_amount']; ?> %</td>
<td><?php echo $max_humi['max_amount']; ?> %</td>
<td><?php echo round($avg_humi['avg_amount'], 2); ?> %</td>
</tr>
</table>
</div>
</section>
<?php
echo '<h2> View Latest ' . $readings_count . ' Readings</h2>
<table cellspacing="5" cellpadding="5" id="tableReadings">
<tr>
<th>ID</th>
<th>Sensor</th>
<th>Location</th>
<th>Value 1</th>
<th>Value 2</th>
<th>Value 3</th>
<th>Timestamp</th>
</tr>';
$result = getAllReadings($readings_count);
if ($result) {
while ($row = $result->fetch_assoc()) {
$row_id = $row["id"];
$row_sensor = $row["sensor"];
$row_location = $row["location"];
$row_value1 = $row["value1"];
$row_value2 = $row["value2"];
$row_value3 = $row["value3"];
$row_reading_time = $row["reading_time"];
// Uncomment to set timezone to - 1 hour (you can change 1 to any number)
//$row_reading_time = date("Y-m-d H:i:s", strtotime("$row_reading_time - 1 hours"));
// Uncomment to set timezone to + 7 hours (you can change 7 to any number)
//$row_reading_time = date("Y-m-d H:i:s", strtotime("$row_reading_time + 7 hours"));
echo '<tr>
<td>' . $row_id . '</td>
<td>' . $row_sensor . '</td>
<td>' . $row_location . '</td>
<td>' . $row_value1 . '</td>
<td>' . $row_value2 . '</td>
<td>' . $row_value3 . '</td>
<td>' . $row_reading_time . '</td>
</tr>';
}
echo '</table>';
$result->free();
}
?>
<script>
var value1 = <?php echo $last_reading_temp; ?>;
var value2 = <?php echo $last_reading_humi; ?>;
setTemperature(value1);
setHumidity(value2);
function setTemperature(curVal){
//set range for Temperature in Celsius -5 Celsius to 38 Celsius
var minTemp = -5.0;
var maxTemp = 38.0;
//set range for Temperature in Fahrenheit 23 Fahrenheit to 100 Fahrenheit
//var minTemp = 23;
//var maxTemp = 100;
var newVal = scaleValue(curVal, [minTemp, maxTemp], [0, 180]);
$('.gauge--1 .semi-circle--mask').attr({
style: '-webkit-transform: rotate(' + newVal + 'deg);' +
'-moz-transform: rotate(' + newVal + 'deg);' +
'transform: rotate(' + newVal + 'deg);'
});
$("#temp").text(curVal + ' ºC');
}
function setHumidity(curVal){
//set range for Humidity percentage 0 % to 100 %
var minHumi = 0;
var maxHumi = 100;
var newVal = scaleValue(curVal, [minHumi, maxHumi], [0, 180]);
$('.gauge--2 .semi-circle--mask').attr({
style: '-webkit-transform: rotate(' + newVal + 'deg);' +
'-moz-transform: rotate(' + newVal + 'deg);' +
'transform: rotate(' + newVal + 'deg);'
});
$("#humi").text(curVal + ' %');
}
function scaleValue(value, from, to) {
var scale = (to[1] - to[0]) / (from[1] - from[0]);
var capped = Math.min(from[1], Math.max(from[0], value)) - from[0];
return ~~(capped * scale + to[0]);
}
</script>
</body>
</html>
다음 URL 경로에서 도메인 이름에 액세스하려고 하면 다음이 표시됩니다.
http://example.com/esp-weather-station.php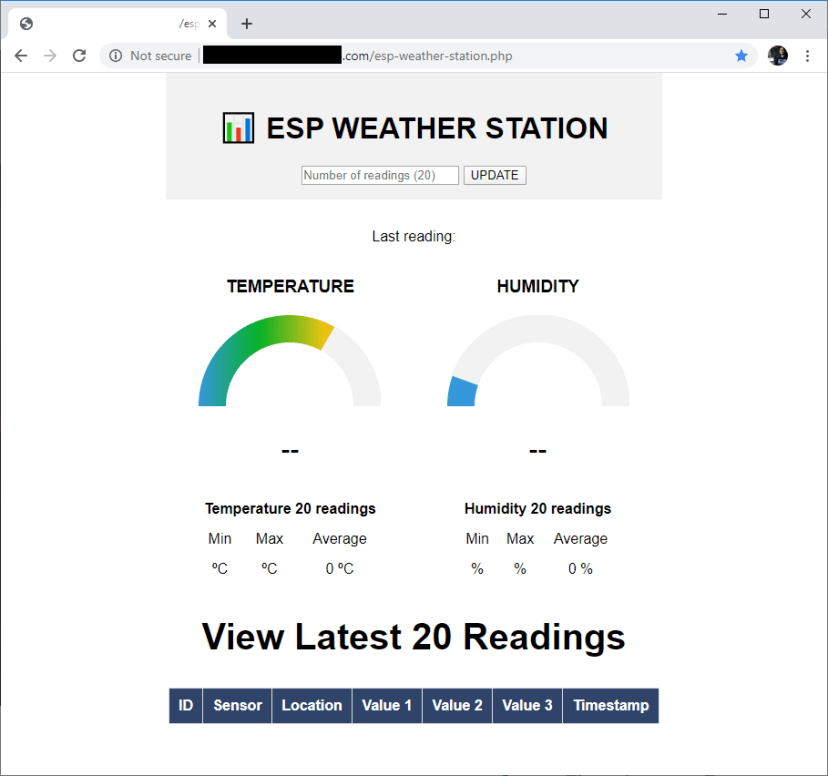
브라우저에 빈 값이 있는 웹 페이지가 표시되면 모든 것이 준비되었음을 의미합니다.
다음 섹션에서는 ESP32 또는 ESP8266의 데이터를 데이터베이스에 삽입하는 방법을 배웁니다.
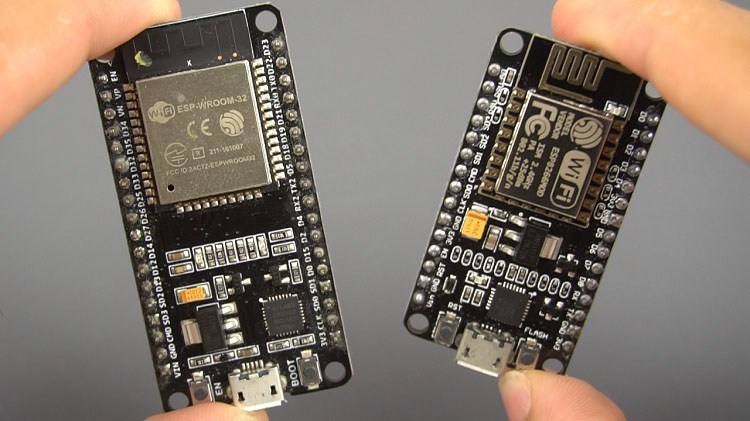
6. ESP32 또는 ESP8266 준비
이 프로젝트는 ESP32 및 ESP8266 보드와 모두 호환됩니다.
간단한 회로를 조립하고 제공된 스케치를 업로드하여 온도, 습도, 압력 등을
10분마다 데이터베이스에 업로드하기만 하면 됩니다.
필요한 부품
이 예에서는 BME280 센서에서 센서 판독값을 얻습니다.
다음은 이 프로젝트의 회로를 구축하는 데 필요한 부품 목록입니다.
- ESP32 보드 ( 최고의 ESP32 개발 보드 읽기 )
- 대안 – ESP8266 보드( Best ESP8266 dev boards 읽기 )
- BME280 센서
- 점퍼 와이어
- 브레드보드
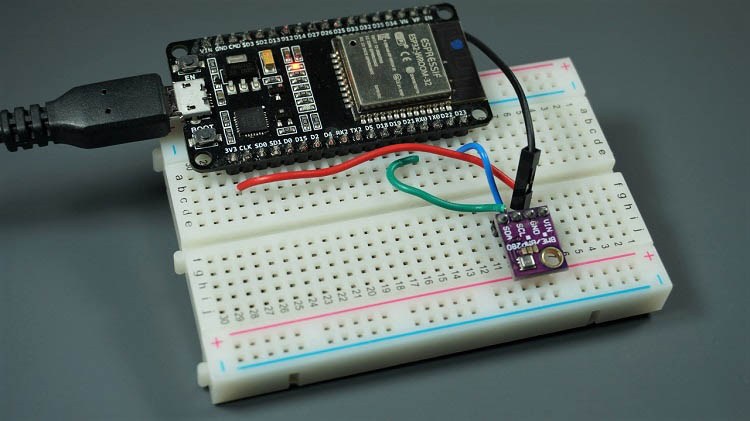
회로도
우리가 사용하는 BME280 센서 모듈은 I2C 통신 프로토콜을 통해 통신하므로
ESP32 또는 ESP8266 I2C 핀에 연결해야 합니다.
BME280 wiring to ESP32
ESP32 I2C 핀은 다음과 같습니다.
- GPIO 22: SCL(SCK)
- GPIO 21: SDA(SDI)
따라서 다음 회로도( BME280 및 ESP32 BME280 웹 서버가 있는 ESP32 가이드)에
표시된 대로 회로를 조립합니다 .

ESP8266에 BME280 배선
ESP8266 I2C 핀은 다음과 같습니다.
- GPIO 5 (D1): SCL(SCK)
- GPIO 4 (D2): SDA(SDI)
ESP8266 보드를 사용하는 경우 다음 회로도와 같이 회로를 조립합니다( BME280이 포함된 ESP8266 가이드 참조 ).

ESP32/ESP8266 코드
Arduino IDE를 사용하여 ESP32/ESP8266을 프로그래밍할 것이므로
Arduino IDE에 ESP 애드온이 설치되어 있어야 합니다.
사용 중인 보드에 따라 다음 자습서 중 하나를 따르세요.
- Arduino IDE에 ESP32 보드 설치
– BME280 라이브러리 및 Adafruit_Sensor 라이브러리도 설치 해야 합니다. - Arduino IDE에 ESP8266 보드 설치
– BME280 라이브러리 및 Adafruit_Sensor 라이브러리도 설치 해야 합니다.
필요한 보드 애드온 및 라이브러리를 설치한 후 다음
코드를 Arduino IDE에 복사하되 아직 업로드하지 마십시오.
작동하려면 몇 가지를 변경해야 합니다.
/*
  Rui Santos
  Complete project details at Complete project details at https://RandomNerdTutorials.com/cloud-weather-station-esp32-esp8266/

  Permission is hereby granted, free of charge, to any person obtaining a copy
  of this software and associated documentation files.

  The above copyright notice and this permission notice shall be included in all
  copies or substantial portions of the Software.

*/

#ifdef ESP32
  #include <WiFi.h>
  #include <HTTPClient.h>
#else
  #include <ESP8266WiFi.h>
  #include <ESP8266HTTPClient.h>
  #include <WiFiClient.h>
#endif

#include <Wire.h>
#include <Adafruit_Sensor.h>
#include <Adafruit_BME280.h>

const char* ssid = "REPLACE_WITH_YOUR_SSID";
const char* password = "REPLACE_WITH_YOUR_PASSWORD";

//Your Domain name with URL path or IP address with path
const char* serverName = "http://example.com/esp-post-data.php";

// Keep this API Key value to be compatible with the PHP code provided in the project page.
// If you change the apiKeyValue value, the PHP file /esp-post-data.php also needs to have the same key
String apiKeyValue = "tPmAT5Ab3j7F9";
String sensorName = "BME280";
String sensorLocation = "Office";

/*#include <SPI.h>
#define BME_SCK 18
#define BME_MISO 19
#define BME_MOSI 23
#define BME_CS 5*/

#define SEALEVELPRESSURE_HPA (1013.25)

Adafruit_BME280 bme;  // I2C
//Adafruit_BME280 bme(BME_CS);  // hardware SPI
//Adafruit_BME280 bme(BME_CS, BME_MOSI, BME_MISO, BME_SCK);  // software SPI

// the following variables are unsigned longs because the time, measured in
// milliseconds, will quickly become a bigger number than can be stored in an int.
unsigned long lastTime = 0;
// Timer set to 10 minutes (600000)
//unsigned long timerDelay = 600000;
// Set timer to 30 seconds (30000)
unsigned long timerDelay = 30000;

void setup() {
  Serial.begin(115200);

  WiFi.begin(ssid, password);
  Serial.println("Connecting");
  while(WiFi.status() != WL_CONNECTED) {
    delay(500);
    Serial.print(".");
  }
  Serial.println("");
  Serial.print("Connected to WiFi network with IP Address: ");
  Serial.println(WiFi.localIP());

  // (you can also pass in a Wire library object like &Wire2)
  bool status = bme.begin(0x76);
  if (!status) {
    Serial.println("Could not find a valid BME280 sensor, check wiring or change I2C address!");
    while (1);
  }

  Serial.println("Timer set to 30 seconds (timerDelay variable), it will take 30 seconds before publishing the first reading.");
}

void loop() {
  //Send an HTTP POST request every 10 minutes
  if ((millis() - lastTime) > timerDelay) {
    //Check WiFi connection status
    if(WiFi.status()== WL_CONNECTED){
      WiFiClient client;
      HTTPClient http;

      // Your Domain name with URL path or IP address with path
      http.begin(client, serverName);

      // Specify content-type header
      http.addHeader("Content-Type", "application/x-www-form-urlencoded");

      // Prepare your HTTP POST request data
      String httpRequestData = "api_key=" + apiKeyValue + "&sensor=" + sensorName
                            + "&location=" + sensorLocation + "&value1=" + String(bme.readTemperature())
                            + "&value2=" + String(bme.readHumidity()) + "&value3=" + String(bme.readPressure()/100.0F) + "";
      Serial.print("httpRequestData: ");
      Serial.println(httpRequestData);

      // You can comment the httpRequestData variable above
      // then, use the httpRequestData variable below (for testing purposes without the BME280 sensor)
      //String httpRequestData = "api_key=tPmAT5Ab3j7F9&sensor=BME280&location=Office&value1=24.75&value2=49.54&value3=1005.14";

      // Send HTTP POST request
      int httpResponseCode = http.POST(httpRequestData);

      // If you need an HTTP request with a content type: text/plain
      //http.addHeader("Content-Type", "text/plain");
      //int httpResponseCode = http.POST("Hello, World!");

      // If you need an HTTP request with a content type: application/json, use the following:
      //http.addHeader("Content-Type", "application/json");
      //int httpResponseCode = http.POST("{\"value1\":\"19\",\"value2\":\"67\",\"value3\":\"78\"}");

      if (httpResponseCode>0) {
        Serial.print("HTTP Response code: ");
        Serial.println(httpResponseCode);
      }
      else {
        Serial.print("Error code: ");
        Serial.println(httpResponseCode);
      }
      // Free resources
      http.end();
    }
    else {
      Serial.println("WiFi Disconnected");
    }
    lastTime = millis();
  }
}
네트워크 자격 증명 설정
네트워크 자격 증명으로 다음 줄을 수정해야 합니다.
SSID 및 암호. 코드는 어디를 변경해야 하는지 잘 설명되어 있습니다.
// Replace with your network credentials
const char* ssid     = "REPLACE_WITH_YOUR_SSID";
const char* password = "REPLACE_WITH_YOUR_PASSWORD";
serverName 설정
ESP가 판독값을 자체 서버에 게시할 수 있도록 도메인 이름도 입력해야 합니다.
const char* serverName = "http://example.com/esp-post-data.php";이제 보드에 코드를 업로드할 수 있습니다.
ESP32 또는 ESP8266 보드 모두에서 바로 작동해야 합니다.
코드가 어떻게 작동하는지 알고 싶다면 다음 섹션을 읽어보세요.
코드 작동 방식
이 프로젝트는 이미 꽤 길기 때문에
코드가 어떻게 작동하는지 자세히 다루지는 않겠지만 다음은 간단한 요약입니다.
- 작동하도록 모든 라이브러리 가져오기
(Arduino IDE에서 선택한 보드를 기반으로 ESP32 또는 ESP8266 라이브러리를 가져옴) - 변경하려는 변수를 설정합니다(apiKeyValue, sensorName, sensorLocation)
- apiKeyValue 수정할 수 있는 임의의 문자열일 뿐입니다.
보안상의 이유로 사용되므로 API 키를 아는 사람만 데이터베이스에 데이터를 게시할 수 있습니다. - 디버깅 목적으로 직렬 통신 초기화
- 라우터와 Wi-Fi 연결 설정
- 판독값을 얻으려면 BME280을 초기화하십시오.
그런 다음, loop() 실제로 최신 BME280 판독값으로 10분마다 HTTP POST 요청을 하는 곳입니다.
/ Your Domain name with URL path or IP address with path
http.begin(serverName);

// Specify content-type header
http.addHeader("Content-Type", "application/x-www-form-urlencoded");

// Prepare your HTTP POST request data
String httpRequestData = "api_key=" + apiKeyValue + "&sensor=" + sensorName                      + "&location=" + sensorLocation + "&value1=" + String(bme.readTemperature())                      + "&value2=" + String(bme.readHumidity()) + "&value3=" + String(bme.readPressure()/100.0F) + "";

int httpResponseCode = http.POST(httpRequestData);
댓글을 달 수 있습니다.httpRequestData 모든 BME280 판독값을 연결하고 사용하는
위의 변수 httpRequestData 테스트 목적으로 아래 변수:
String httpRequestData = "api_key=tPmAT5Ab3j7F9&sensor=BME280&location=Office&value1=24.75&value2=49.54&value3=1005.14";데모
모든 단계를 완료한 후 ESP 보드가 일부 판독값을 수집하여 서버에 게시하도록 합니다.
모든 것이 정확하면 Arduino IDE 직렬 모니터에 다음과 같이 표시됩니다.

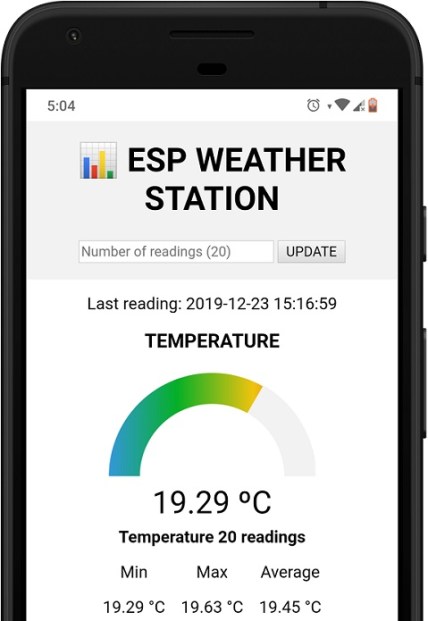
이 URL 경로에서 도메인 이름을 여는 경우:
http://example.com/esp-weather-station.php데이터베이스에 저장된 최근 20개의 판독값이 표시되어야 합니다. 최신 온도 및 습도 판독값과 타임스탬프를 표시하는 두 개의 게이지가 있습니다.
웹 페이지를 새로고침하여 최신 판독값을 확인하십시오.

시각화할 판독값 수와 이러한 통계에 대한 판독값 수(최소, 최대 및 평균)를
입력할 수 있는 필드가 있습니다. 기본적으로 20으로 설정되어 있습니다.
예를 들어 30을 입력하고 업데이트 버튼을 누르면 웹 페이지가 모든 값을 업데이트하고
다시 계산하는 것을 볼 수 있습니다.

웹 페이지는 또한 모바일 반응형이므로 모든 장치를 사용하여 다음 항목에 액세스할 수 있습니다.
phpMyAdmin으로 이동하여 컴퓨터에 저장된 데이터를 관리할 수도 있습니다.
SensorData테이블. 삭제, 수정 등을 할 수 있습니다.

마무리
이 자습서에서는 전 세계 어디에서나 액세스할 수 있는
자체 서버 도메인의 데이터베이스에 센서 데이터를 게시하는 방법을 배웠습니다.
이를 위해서는 자체 서버와 도메인 이름 이 필요합니다
(또는 로컬 액세스를 위해 Raspberry Pi LAMP 서버를 사용할 수 있음 ).
웹 페이지 모양을 변경하고, 더 많은 기능( 예: 이메일 알림 )을 추가하고 ,
다른 센서의 데이터를 게시하고, 여러 ESP 보드를 사용하는 등의 작업을 수행하는 것이 좋습니다.
[출처번역인용] https://randomnerdtutorials.com/cloud-weather-station-esp32-esp8266/
'ESP32' 카테고리의 다른 글
| ESP32 Data Logging Temperature to MicroSD Card (0) | 2021.08.16 |
|---|---|
| ESP32 NTP Client-Server: Get Date and Time (Arduino IDE) (0) | 2021.08.16 |
| ESP32 HTTP GET and HTTP POST with Arduino IDE (JSON, URL Encoded, Text) (0) | 2021.08.16 |
| ESP32 Deep Sleep with Arduino IDE and Wake Up Sources (0) | 2021.08.16 |
| Wiring the LCD to the ESP32 (0) | 2021.08.16 |