데이터를 요청하는 ESP32에 구현된 Modbus RTU 프로토콜에 대한 테스트 및 설명을 수행합니다 .
이 튜토리얼의 목적은 다음과 같습니다.
1. 산업용 프로토콜의 생성 및 작동을 간단한 방법으로 설명합니다.
Modbus RTU 프로토콜은 수많은 산업용 애플리케이션에서 사용 및 구현됩니다.
2. RS485 변환기에 TTL to RS485 변환기로서 XY-K485 모듈의 장점
- DE 및 RE 활성화가 필요하지 않으며 Rx 및 Tx만 필요합니다 .
- 3.3V ~ 30VDC의 전원.
- RS485 통신의 절연, 열 퓨즈 및 보호(TVS 양방향 과도 억제 다이오드) .
- Rx 수신 및 Tx 전송을 나타내는 LED.
3. 이 구현은 Modbus RTU 프로토콜의 기본적인 설명을 위한 것이지
실제 산업 응용 프로그램에 직접 적용하기 위한 것이 아닙니다.
재료 및 구입처

연결하기
XY-K485 변환기의 가장 큰 장점은 수신을 위해 DE / 및 RE 가 필요하지 않고
Rx 및 Tx로만RS485 통신을 수행한다는 것 입니다.

Meter PZEM-016 Slave Modbus RTU (RS485)
 |
 |
Modbus Registers of the Meter PZEM-016
10 개 읽기 레지스터 와 2 개 쓰기 레지스터를 가지고 있습니다.
- 10개의 읽기 레지스터는 측정 (전압, 전류, 전력, 누적 전력, 주파수 및 역률) 에 해당하며
최대 순간 전력 제한(와트)에 대한 경보 기록이 있습니다. - 2개의 쓰기 레지스터 는 알람(와트)의 값 과 슬레이브 주소에 해당합니다.
참고: 누적 전력을 재설정할 수 있지만 특정 기록은 설명서에 언급되어 있지 않습니다.

Mounting

Modbus RTU: Master frame send
ESP32는 RS485를 통하여 PZEM-016미터 에게 마스터프레임 리퀘스트를 보냅니다


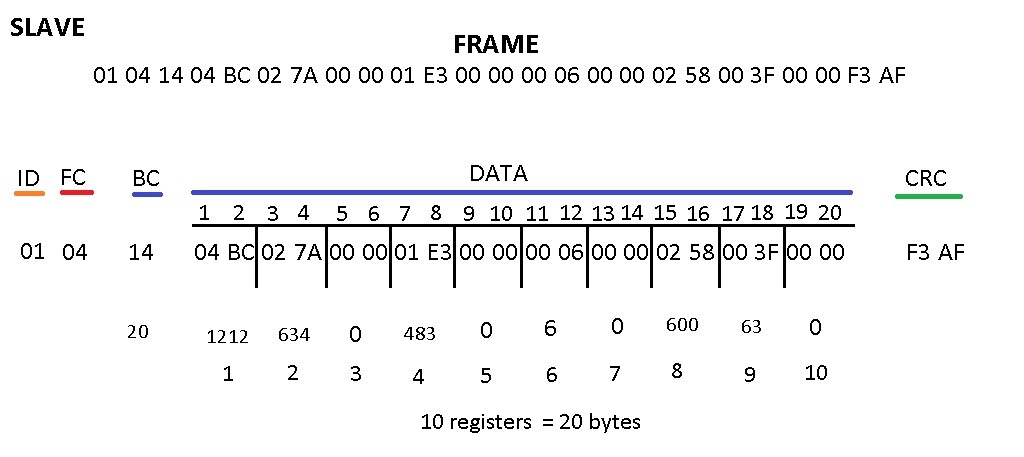
Modbus RTU: Slave Frame Reception
PZEM-016미터는 Modbus RTU Slave 로스 응답합니다

Test 1: ESP32 Code Bridge Mode USB to Serial
ESP32를 통해서 USB to Serial Bridge를 생성합니다.

Test 2: Modbus RTU simulator
Modbus 시뮬레이터를 사용하면 전송 및 수신 프레임을 모니터링 할 수 있으므로
훨씬 쉽게 사용할 수 있습니다.

Test 3: PeaceFair PZEM-014 Master Software

Test Arduino IDE
Modbus Master 모드 및 Slave 수신 처리에서 ESP32 를 보내기 위해 프레임이 생성되었으며
이 코드는 다음을 수행합니다.
- 마스터프레임을 보냈습니다.
- 슬레이브 프레임 수신.
- 바이트를 Int로 변환
- 측정에 대한 기록의 표준화.
이 예제는 레지스터 읽기만 수행합니다 .
향후 자습서에서 modbus 레지스터 쓰기가 작동하는 방식을 설명합니다.
우리는 단순히 10개 레지스터에 리퀘스트 프레임을 보내고
PZEM-016 Meter 는 10개 레지스터에 해당하는 20개 바이트로 응받합니다
참고: 중요, Arduino IDE 기본에서 이 구현은
CRC 또는 체크섬의 유효성 검사 방법을 사용하지 않습니다.

Serial Debugging
올바른 ESP32 및 PZEM-016 통신 을 검증하기 위해
HEX 프레임 디버깅을 위한 직렬 포트 가 활성화되었습니다.

결론
처음에 언급했듯이 이 튜토리얼은 Modbus RTU 프로토콜이
RS485 에서 어떻게 작동 하는지에 대한 간략한 소개 또는 설명입니다 .
이것은 산업적 목적 이 없는 테스트이기 때문에
CRC 또는 Checksum 프로토콜 의 유효성 검사 방법을
고려하지 않은 기본 또는 교훈적인 구현 입니다.
PZEM - 016 미터가 5VDC를 가지고 있지만 이 경우에는 사용하지 않지만,
ESP32 과 XY-K485 에 전원을 공급할 수 있습니다.
/*
 * Basic Routine ESP32 Bridge Mode
 * Rutina Basica ESP32 Modo Puente
 *  Created by PDAControl
 *
 *
 *  More info      : https://pdacontrolen.com
 *  Mas informacion: http://pdacontroles.com
 *
 *  Channel  Youtube https://www.youtube.com/c/JhonValenciaPDAcontrol/videos
 *
 *
*/
#define RXD2 16
#define TXD2 17

void setup() {

  Serial.begin(9600);
  Serial2.begin(9600, SERIAL_8N1, RXD2, TXD2);
}

void loop() {

  if (Serial2.available()) {
    Serial.write(Serial2.read());
  }

  if (Serial.available()) {
    Serial2.write(Serial.read());
  }

}
/*
 * Basic routine (Simple) Modbus RTU Protocol (Master), Created for communication with PeaceFair Meters PZEM-016 (Modbus RS485)  *
 * Rutina basica (Sencilla) Protocolo Modbus RTU (Maestro), Creada para comunicacion con Medidores PZEM-016 (Modbus RS485) de PeaceFair *
 *  Created by PDAControl
 *
 *
 *  More info      : https://pdacontrolen.com/basic-modbus-rtu-master-rs485-test-with-esp32-xy-k485-pzem-016-without-libraries/
 *  Mas informacion: http://pdacontroles.com/prueba-basica-modbus-rtu-maestro-rs485-con-esp32-xy-k485-pzem-016-sin-librerias/
 *  Video: Tutorial Complete : https://youtu.be/FwKbfq1WYSM
 *
 *
 *  Channel  Youtube https://www.youtube.com/c/JhonValenciaPDAcontrol/videos
 *
 * Reading Routine 10 Registers (Input Registers) 0x04
 * It is a basic routine, it is not a complete implementation.
 * Requires ESP32 + Converter (RS485-TTL) XY-K485 + PZEM-016 Meter (Modbus RTU RS485)
 *
 * Rutina de Lectura 10 Registros (Input Registers) 0x04
 * Es una rutina basica, no es una implementacion completa.
 * Requiere ESP32 + Convertidor (RS485-TTL) XY-K485 + Medidor PZEM-016(Modbus RTU RS485)
 *
 *
*/

#define RXD2 16
#define TXD2 17

byte ByteArray[250];
int ByteData[20];

void setup() {

  Serial.begin(9600);
  Serial2.begin(9600, SERIAL_8N1, RXD2, TXD2);  /// Speed default PZEM-016 Modbus
}

void loop() {

 delay(200);


  //// -  1 step
 ///// Master frame request 10 registers (Input Registers) ///////////////////////////////////////////
 ///// Trama de Maestro solicitud 10 registros (Input Registers) ////////////////////////////////////

 byte msg[] = {0x01,0x04,0x00,0x00,0x00,0x0A,0x70,0x0D};

 int i;
 int len=8;

////// Sending Frame Modbus for Serial Port 2
/////// Envio de Trama Modbus por Puerto Serial #2

Serial.println("ENVIO DATOS  -  SEND DATA");
for(i = 0 ; i < len ; i++){
      Serial2.write(msg[i]);
      Serial.print("[");
      Serial.print(i);
      Serial.print("]");
      Serial.print("=");
      Serial.print(String(msg[i], HEX));
 }
 len = 0;
 Serial.println();
 Serial.println();
////////////////////////////////////////////////////////////////////////////////////////////////////
////////////////////////////////////////////////////////////////////////////////////////////////////


//// -  2 step
////////// Reception  Frame 10 Registers (Input Registers) Modbus RTU - RS485 ////////////////////////
/////////// Recepción de Trama 10 Registros (Input Registers) Modbus RTU - RS485 //////////////////////

int a = 0;
 while(Serial2.available())
 {
 ByteArray[a] = Serial2.read();
 a++;
 }

 int b = 0;
 String registros;
    Serial.println("DATA RECEPTION  -  RECEPCIÓN DATOS");
    for(b = 0 ; b < a ; b++){
      Serial.print("[");
      Serial.print(b);
      Serial.print("]");
      Serial.print("=");

      registros =String(ByteArray[b], HEX);
      Serial.print(registros);
      Serial.print(" ");
   }
       Serial.println();
       Serial.println();
////////////////////////////////////////////////////////////////////////////////////////////////////
////////////////////////////////////////////////////////////////////////////////////////////////////


//// -  3 step
//////// Procesamiento de Registros HEX  //////////////////////////////////////////////////////////
//////// HEX Registers Processing ////////////////////////////////////// ////////////////////
//////// Conversion de 2 Byte a 1 int - Conversion from 2 Byte to 1 int

Serial.println("REGISTERS HEX");

ByteData[0] = ByteArray[3] * 256 + ByteArray[4];
Serial.println(ByteData[0],DEC);
ByteData[1] = ByteArray[5] * 256 + ByteArray[6];
Serial.println(ByteData[1],DEC);
//ByteData[2] = ByteArray[7] * 256 + ByteArray[8];
//Serial.println(ByteData[2],DEC);
ByteData[3] = ByteArray[9] * 256 + ByteArray[10];
Serial.println(ByteData[3],DEC);
//ByteData[4] = ByteArray[11] * 256 + ByteArray[12];
//Serial.println(ByteData[4],DEC);
ByteData[5] = ByteArray[13] * 256 + ByteArray[14];
Serial.println(ByteData[5],DEC);
//ByteData[6] = ByteArray[15] * 256 + ByteArray[16];
//Serial.println(ByteData[6],DEC);
ByteData[7] = ByteArray[17] * 256 + ByteArray[18];
Serial.println(ByteData[7],DEC);
ByteData[8] = ByteArray[19] * 256 + ByteArray[20];
Serial.println(ByteData[8],DEC);
//ByteData[9] = ByteArray[21] * 256 + ByteArray[22];
//Serial.println(ByteData[9],DEC);
//ByteData[10] = ByteArray[23] * 256 + ByteArray[24];
//Serial.println(ByteData[10],DEC);

Serial.println();
Serial.println();
////////////////////////////////////////////////////////////////////////////////////////////////////
////////////////////////////////////////////////////////////////////////////////////////////////////


//// -  4 step
///////// Securities Normalization ////////////////////////////////////// /////////////////////////
/////////Normalizacion de Valores//////////////////////////////////////////////////////////////////

float Voltage,Current,Power,Energy,Frequency,PowerFactor;
Voltage     = ByteData[0] * 0.1;     // Tensión (80-260VAC)
Current     = ByteData[1] * 0.001;   // Corriente (0-100A)
Power       = ByteData[3] * 0.1;     // Potencia Activa (0-23000W)
Energy      = ByteData[5] ;          // Potencia Acumulada (0-9999kWh)
Frequency   = ByteData[7] * 0.1;     // Frecuencia (45-65Hz)
PowerFactor = ByteData[8] * 0.01;    // Factor de Potencia (0.00 – 1.00)

Serial.println("MEDICIONES - MEASUREMENTS");
Serial.print("Voltage ");
Serial.println(Voltage);
Serial.print("Current ");
Serial.println(Current);
Serial.print("Power ");
Serial.println(Power);
Serial.print("Energy ");
Serial.println(Energy);
Serial.print("Frequency ");
Serial.println(Frequency);
Serial.print("PowerFactor ");
Serial.println(PowerFactor);
Serial.println();
delay(200);                      /// delay para permitir ver valores - delay to allow viewing values -
////////////////////////////////////////////////////////////////////////////////////////////////////
////////////////////////////////////////////////////////////////////////////////////////////////////


}
Basic Modbus RTU Master RS485 Test with ESP32 + XY-K485 + PZEM-016 (without libraries) - PDAControl
In this opportunity we will carry out tests and explanation of the Modbus RTU protocol implemented in ESP32 requesting data from the Single-phase consumption meter PZEM-016. The intent of this tutorial is: 1. Explain in a simple way the creation and operat
pdacontrolen.com
'ESP32' 카테고리의 다른 글
| ESP32 with DHT11/DHT22 Temperature and Humidity Sensor using Arduino IDE (0) | 2022.02.21 |
|---|---|
| ESP32 웹 서버를 만드는 방법 (0) | 2022.02.21 |
| ESP32 Serial 통신 라이브러리, software Serial? (0) | 2021.09.02 |
| How to work with RS485 interface on ESP32 (0) | 2021.08.23 |
| Inexpensive RS485 module with ESP32 (hardware serial) (0) | 2021.08.23 |